Showing posts with label hair tutorial. Show all posts

Thursday, June 28, 2012

Voluminous Waves Hair Tutorial


Waaaaaahhhhhhh!  I totally miss you guys!  In a nutshell, moving has been a nightmare...one of the water pipes in our new/old (85 years old, in fact) home busted last week and we haven't been able to use any water at all until just this morning.  Then, last night, there was the strong smell of gas in our kitchen.  The contractor checked it out this morning and confirmed that there was a gas leak!  That's not the half of it...still tons of stuff to be done, but I think we're almost there...just one more week or so to go until I don't have to worry about fixing any more problems or making any additional improvements.  I can't wait to get settled in already!  This whole home ownership business can get complicated quick!

But ANYWAYS, on to more interesting things.  Several weeks ago, the folks over at iVillage contacted me, asking if I'd be interested in doing a hair tutorial video for them.  I'm a fan of iVillage, so of course I was thrilled!  Anyways, it's been up for a couple of days now, but I haven't had the time to post.  If you want, you can check me out on iVillage's site.  I'll also post the YouTube video below as well.  Hope you like!

 
Before and After


Friday, March 16, 2012

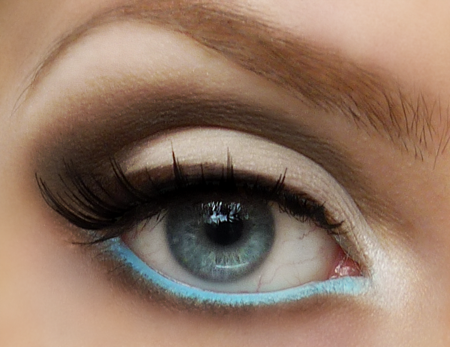
Pale Turquoise Waterline

I've been a little obsessed with pastel, cool colors lately...particularly blues.  Pale turquoise is one of my favorites, but I don't use it often because I don't want to play it out.  It's been raining here in the SF Bay Area for a week now...and I decided, what the heck, I need a little color to brighten up these dreary days.  Here's the look:


My inspiration came from the lovely Meredith of Pigments and Palettes:


To create my interpretation, I used my Coastal Scents 88 Original palette.  To start, I apply a shade of pale turquoise halfway across my primed upper eyelid:


Next, I'm going to apply a dark brown shade to the outer corner of my upper eyelid:


Then I'm going to soften the outer crease color with a medium brown shade:


With a soft, white eyeliner pencil, I'm going to line my lower lash line, being sure to line my waterline as well:


Using the same, pale turquoise shade, I'm going to layer over the white liner:


Now I'm going to take my Urban Decay Eyeshadow Pencil in Rehab, and trace outside of my now-turquoise liner:


Then I'm going to layer the medium-brown shadow over the eyeshadow pencil:


To brighten the look and add a little shimmer, I'm going to use my UD Eyeshadow Pencil in Sin and blend along the outer edge of the darker liner:


For added depth, I'm going to apply a little matte black shadow to the outer corners of my top and bottom eyelids:


Now I'm just going to use some black gel/cream eyeliner to sweep a winged line along my upper lash line:


Apply mascara and some false lashes and I'm finished!


Overall look:

Cheeks: ELF Studio Blush in Pink Passion.  Lips: ELF Studio Glossy Gloss in Wild Watermelon.

Not only does the pale turquoise add a pleasant pop of color, it brightens and widens my small, almond-shaped eyes as well.  LOVE!  I can see myself doing this often. :D

Hope you all enjoyed and have a great night!

Hugs,
Cat

Wednesday, November 2, 2011

Messy Triple Bun Tutorial

I was so excited about yesterday night's impromptu updo that I decided to make a video tutorial for it today!


A few things I wanted to note:

Since I have very straight, flat, Asian hair that's a slightly challenging to style, there was some preparation required in order to create this 'do. I needed to curl my hair for body and volume as well as tease the crown for added height and texture.  If you have fairly manageable hair, you can go ahead and skip these steps. (lucky you!)

Here you go:


I really love this style!  It's my favorite new updo because it's so cute and easy.  Lately, the air has been so dry and full of static because of the change in weather, so this is a really attractive way to keep it under control.  This could also be very pretty, adorned with flowers or feathers, for an elegant affair or even a wedding for the low-key, DIY bride!

For those that are interested, I hope you get a chance to try this.  I'm really terrible with hair, so if I can do it, anyone can do it! :)

Hugs,
Cat

*BONUS*

After wearing my hair this way for 10 hours, I get the added bonus of shiny, bouncy waves and tons of volume:

Demure by day, disco by night!

How cool is that?  I can wear my hair up while at work or school, and then take it down and be ready for an evening out on the town! :)


p.s. I used Spornette's Big Wonder teasing brush in order to achieve this look.  You can win one my entering my latest giveaway!

Saturday, October 22, 2011

Wet N Wild mini haul plus eyeshadow tutorial!

Hello!  I earned about $20 in CVS Extra Care Bucks, so I treated myself to a Wet N Wild mini haul, plus Essie's Spaghetti Strap (which I posted a couple days ago).  Here's the look that I created with some of the things I got:


Scroll down for my YouTube tutorial on how to do it!  Oh, but don't forget to check out the WnW products that made it possible:


Doesn't this eyeshadow trio remind you of Neopolitan ice cream?  The colors are absolutely adorable and can easily be used for a natural look as well as a dramatic look.  It's a shimmery palette with passable pigmentation for the price.


This was my absolute favorite buy of the bunch!  WnW's creme eyeliner can rival brands that charge more than triple the price.  The formula is smooth, glides on like a dream, and has excellent opacity and pigmentation.  Sorry, but I don't think I'll be buying MAC's Blacktrack again!  Though one can argue that there's less product, therefore lower price.  Still, I usually only get halfway through my Fluidline before it dries out, so in that sense, this is truly the better buy.


I really wanted to love this waterproof mascara, but I just don't think it worked well with MY particular eyelashes.  Unfortunately, I have stick-straight, wimpy Asian eyelashes which require a lot of work to appear curly with any semblance of length whatsoever.  The formula for Waterproof MegaLength proved to be too heavy and completely straightened out my eyelashes after I had curled them.  I either need to use a lash primer to hold my curl prior to using this or just skip it altogether.  I imagine it would work just fine for all you non-asians out there with long, thick lashes.  Although with lashes like that, I don't even know why you'd need mascara!


Ok, so this is the only thing I didn't use in the tutorial, but I'm really excited to review it in another post.  Who doesn't love hot pink lipstick?

Okie dokie.  So here's the video.  It's a little on the longer side, and looking back, I feel I could have skipped a few steps or did some more efficiently.  I could have probably edited better too, still, I think it gets the lesson across:


Overall look:


Thanks for reading and watching!  Hope y'all found my latest tutorial helpful. :D  Oh and in case you haven't yet: 


Wednesday, October 12, 2011

The Big Tease: video hair tutorial on how I create volume.

So yesterday I posted a video on I make my hair curly.  Today, I’m going to show you how I make it BIG!  Remember the Spornette Little Wonder teasing brush I bought a few days ago?  Well, you’re about to see it in action!
I curled my hair this morning and about 2 hours later it looked like this:


With a little bit of help from my Little Wonder, however, I can get it to look like this:


So here’s the step-by-step video tutorial that I made:


Product Details:
Hairspray: Vavoom Freezing Spray by Matrix


In addition to making your hair look full and voluminous when it's down, you can create a very pretty look by simply putting a clip in your hair.  The bouffant from the teasing makes for a very polished and elegant hairstyle.


From yesterday.


I hope that I’ve been helpful!  Since I’m really new to the whole video business, I would definitely appreciate feedback.  What do you like?  What don’t you like?  What would you like to see more of?  Do have any video tutorial requests?  Let me know!
Hugs,
Cat


p.s. It appears I'm having a font problem.  Although everything looks normal in edit mode, there seems to be a weird font-sizing situation going on when I publish my post.  Sorry!

Making Waves: video tutorial on how I curl my hair.

Hi!  So I am proud to present my very first video tutorial!  Yay!  Please be forgiving if it's a little awkward and not as eloquent as you may have expected it to be.  I worked really hard on it (obviously since I'm posting it sometime past midnight on a school night, lol) and I promise I'll get better with practice!

So in my little YouTube video, I'm going to show you how I get from this:


to this:


A few important points (including those that I forgot to mention in the video):

a) After showering, I always apply a heat protectant to my hair.  My favorite is It's A 10.  Without it, my hair would be fried the way I abuse it on a daily basis.

b) I blow-dried my hair with a round brush before curling.

c) My curling iron is the Hot Tools High Heat Spring Grip 1.25" Barrel

Two REALLY big differences I noticed between photo and video is:

1.  it's darn-near impossible to get any kind of decent lighting.

2.  even though I have enough makeup on my face for an army of clowns, it looks like I'm barely wearing any at all on video.

So anyways, here you go!  Please subscribe and help my little baby YouTube channel grow! :D


Hugs,
Cat