Showing posts with label glitter. Show all posts

Friday, November 28, 2014

Glittery Holiday Looks

Happy Black Friday, everyone! I was too busy with Thanksgiving to post yesterday, but have been cozily shopping on my laptop all day today, leaving me plenty of time to catch up on my blog absence. 

Anyhoo, glitters are trending for the holiday season (are they ever not?) and I've been busy creating some sparkly looks that are party-perfect!

Champagne Kisses by Violet Voss

Holy Grail by Violet Voss

Violet Voss  makes incredibly intense pigments, but their specialty is unique glitters with massive amounts of sparkle! They also sell a glitter glue primer, perfect for making your glitters stick and last all day, all night. They're in the midst of their Black Friday sale so don't miss out!

Hugs,
Cat

*This post contains commercial samples provided by the manufacturer for the purpose of review.

Wednesday, October 22, 2014

Navy Blue and Teal Glitter Mani

I call this one the Midnight Sorceress! :D I know I've been sharing a lot of Halloween-inspired makeup, so I wanted to add some festive nail designs in the mix as well.


This is pretty much the same technique that I use for my other glitter gradients. See my Halloween Disco Nails tutorial.  However, the lighter part of the gradient begins at the cuticle of the nail as opposed to the tips.

Products used:
  • Revlon Moon Candy polish in Galactic
  • Orly nail polish in It's Up To Blue
  • Wet N Wild Mega Rocks polish in Slap The Bass
More Halloween-inspired nail looks to come, so stay tuned!

Hugs,
Cat

Saturday, October 11, 2014

Teal Glitter Ombre Heart Eyeliner

Well, that's a mouthful, but it is what it is.

I've been spending a bunch of time on Instagram and Pinterest and get so inspired by all sorts of makeup looks. Awhile back, I saw a makeup artist mask out a little heart in her eyeliner which I think is charming and whimsical as heck! I've been masking shapes into my makeup from time to time, since.


The shape-making is easier than it looks. I purchased a bunch of nail decals from a shop called Beyond The Nail. I strategically place the decals on my eyelid, apply makeup, and then use tweezers to carefully peel off the decal once I'm finished. Voila! Cute little cutouts in your makeup!

Products used for this look:
  • Etude House Drawing Eye Brow pencil in Dark Grey
  • Urban Decay Primer Potion in Eden
  • Eyeko Eye Do eyeliner in Black, Visual Eyes eyeliner in Marine, and Making Eyes eyeliner in Blue Teal
  • ColourPop eyeshadow in Get Lucky on the lower lash line
  • Siren Cosmetics pigment in Europa
  • Eyekandy Cosmetics glitter in Spearmint
  • Eyemimo GLM13 eyelashes
Hope everyone is having a fantastic Saturday! As always, thanks for reading! <3

Hugs,
Cat

Wednesday, October 8, 2014

Halloween Makeup Ideas

Halloween is just around the corner so I've been experimenting with magically festive looks for this famously spooky holiday! (my favorite, by far!)

I've posted all the minute details to my Instagram account, but here is a sparkly, Jack-O-Lantern inspired look with a dramatic, triple-wing:


And here is a shimmering, blue look whose focal point is a little star shape masked out on the lower lid:


Hope this gives some of you ideas for fun looks for Halloween! As for blogging, I've got a ton of cool stuff backed up, so I'm trying to catch up on all of my social media platforms! I feel bad just concentrating on Instagram, so I'm earnestly trying to work on it!

Thanks to those of you who are still sticking around and I'll be back with the next post, ASAP! :D

Hugs,
Cat

Wednesday, February 19, 2014

EOTD: Smokey Teal

Happy hump day, all! Just wanted to post a quick EOTD. Did my one of my smokey, go-to looks with a pop of teal:


Product list for this look:
  • Etude House eyebrow pencil - Gray/Brown
  • UDPP - Eden
  • UD 15 Anniversary Palette
  • ELF liquid eyeliner
  • Ulta Eye Crayon - Black Tie
  • Maybelline Full N Soft Waterproof mascara
  • Ardell Demi Pixies
Oh, I'm also using a new glitter called Chicklets, by Eye Kandy Cosmetics. It's really neat! You get a jar of fine, cosmetic loose glitter and a bottle of glitter adhesive solution. You dip an eyeliner brush into the solution, pick up a little loose glitter, and brush on wherever you want to sparkle. I love it! you can apply as sparse or dense as you like and it lasts all day without fallout. I can't wait to show you guys more glitter experiments! :)

Hugs,
Cat

Saturday, January 25, 2014

Sparkly Mint & Gold French Mani

Happy Saturday, all! No TGIF shenanigans for me last night, just worked on some video and pictorial tutorial editing for StyleByCat's blog and YouTube (filming has been exciting, I recently upgraded my camera!). Anyhoo, I needed a break from having my eyes glued to the screen and opted for a DIY mani. Check it out!


Ok, so, I'm no nail art master or anything. (there are some pretty ridiculously talented DIY manicurists out there, holy moly!) However, I thought I did a fairly decent job. *patting myself on the back* My favorite color combo of all time (uh, at the moment, anyway) is mint, gold, and white. I whipped this up in my head and hoped to execute it in real life…turned out nicer than I thought it would!

Ok, so here's the cast:


  • Essie nail polish in Mint Candy Apple
  • Ulta nail polish in Diva
  • Nubar nail art pens in White and Gold
These Nubar nail art pens are pretty darn cool! I learned about them through my sis. When you twist off the top, you get a fine brush that's great for striping. When you pull off the cap (which can be darned difficult…I suggest you get an assistant to help you if your nails aren't dry) you get a fine, squeezy tip that's good for doing dots and things.


To achieve this look, I began by applying a base coat. Next, I applied 2 coats of Mint Candy Apple. Next, I brushed on Diva. Using the brush end of my nail art pens, I painted on white tips and then accented them with a gold stripe. I finished by topping with a coat of Seche Vite.

In retrospect, I think I should have applied the glitter polish right before the Seche Vite, as glitter acts as a sort of polish armor and probably would preserve my tidy little tips more efficiently. That's ok, next time!

Heehee, I can't stop staring at my nails! I can't wait to try out more manis with these cool nail art pens! Anyways, thanks for reading and have a fantastic weekend!

Hugs,
Cat

Wednesday, January 1, 2014

Mermaid Nails

Happy new year!

Goodbye 2013, hello 2014! Hope you all rang in the new year fun and safely! :D I wish I had some epic revelation to share with you regarding my 2013…but the only thing that comes to mind at the moment is that I learned that my favorite hues tend toward mint/teal shades. (surprise surprise)

Anyhoo, celebrated today by coating my tips in a shimmery aqua-mint color duo called Sun Shower for Revlon's Sun Candy collection:


I started with a base coat, applied one coat of the creamy color, one coat of the glitter, and finished with a coat of Seche Vite. The cream coat is a little bit on the thickish side and applies slightly unevenly, but the glitter coat covers any imperfections for a visually perfect finish.

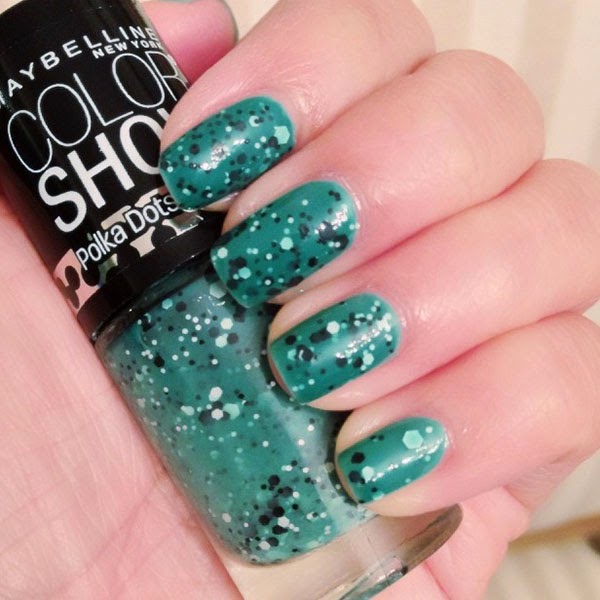
Previously, I also got a chance to try out Drops Of Jade from Maybelline's Color Show Polka Dots collection:


For this look, I applied a base coat, one coat of Essie's Turquoise and Caicos, one coat of Drops of Jade, and finished with a coat of Seche Vite. I really loved how I was able to get substantial bits of black and white hexagonal confetti bits in a variety of sizes. Easy to apply and made for a super-cool effect.

And finally, Mint Candy Apple by Essie. Yeah, it's a pretty popular shade and I'm sure I've posted about it before, but I thought it looked really cool paired with my new Kate Spade stripe wallet. Just a gratuitous shot of a rockin' color scheme:


Something about mint, gold, and white…one of my all-time-favorite color combinations!

Happy Wednesday, all! And cheers to a bright 2014! Thanks for reading. :D

Hugs,
Cat

Sunday, January 6, 2013

Gold & Curls

By nature, I'm an avid reader.  My mom took me to the library on a weekly basis from the time I was, like 4 or 5, to check out books.  However, the age of the internet began and I've slowed down a bit since.  I do read, still, but not quite as voraciously as I used to.  Well, I've recently picked up on it again and it feels good.  I get so absorbed in my novels that I feel like I'm living another life when I'm reading.  In the series I'm currently reading, there some references to ancient Egypt.  I felt inspired, again, to do my Cleopatra-esque, glittery, golden look:


I did this with my Urban Decay Naked palette, using Half Baked, Smog, Darkhorse, and Creep.  I then enhanced the liner on my top lash line with Sephora's Glitter Eyeliner in Gold.  I finished off the look by applying my trusty Ardell #122's.

I also felt like doing something a bit different with my hair.  So I grabbed my Hot Tools curling wand and gave myself some tight, bouncy curls.  Tons of volume that lasts and lasts and lasts...no hairspray required!

That's Pale Mauve on my lips from Bobbi Brown's Atomic Pink palette, btw.
I LOVE my hair like this, but I'm soooooooooo lazy to do it.  It takes more than twice as long as my usual styling routine, so I can only do it when I have time.  Well...it takes about 20-30 minutes, which I think is waaaaaaaaaaay too long.  <---- no patience :P

Anyways, just wanted to let you all know that it's back to school for me starting tomorrow. :(  I've really enjoyed the regular posting and I'll try to stay as regular as possible, but, most likely, posts won't be up on a daily basis.  I'm truly grateful for those who have stuck around (both subscribers and lurkers) to read my humble little blog.  Thanks guys, happy Sunday, and have a great night!

Hugs,
Cat

Wednesday, September 5, 2012

Clash and Woodstock

Hello!  Here's a colorful look I did using UD's 24/7 Glide On Shadow Pencil in Clash, 24/7 liquid eyeliner in Woodstock, and Heavy Metal glitter eyeliner in Catfight:


Clash is one of all-time favorite shadow colors...brilliant turquoise blue with tons of silver sparkle.  The color lasts all day without creasing and, unlike the pressed shadows, there's no glitter fallout.  Easy, efficient, mess-free...that's how I like to roll!  Paired with Woodstock and topped with Catfight, this look definitely packs a punch!

Keepin' it short and sweet today!  Happy Wednesday all!

Hugs,
Cat

Friday, August 24, 2012

Glitter Goddess

Howdy friends!  I've missed you all so much!  It's been one of those weeks...maybe I'm down because all the parties are over, I'm not quite sure, but I'm stuck in the doldrums right now.  Just the feeling of "ennui", I guess.  You know, being a little depressed and not knowing why.  *sigh*  I thought that maybe doing a post would cheer me up a little.  Here is a look that I created using Urban Decay's Goddess eyeshadow:


Sorry the lighting and coloring is totally off!  I'm trying to create a workspace in my new house with more even and natural lighting so that I can give you guys more consistent photography.  Anyhoo...this look is simple and glamorous!  How can you not be glamorous when using an eyeshadow called Goddess?  Haha.  I just applied Goddess to my entire lid, added some black shadow to the outer corners, lined my top and bottom lash lines, accented my top lash line with blue glitter eyeliner and dusted a little more Goddess along my bottom lash liner.  Done!

Hope everyone is enjoying their Friday! (more of a Thursday for me since I have work tomorrow...boo!)

Hugs,
Cat

Monday, May 21, 2012

Haul: Lash Lust

I took another trip to San Francisco's Japantown recently and came back with a bunch of super-pretty lashes! (of course, what else is new?)  Lol, anyways, I thought I'd share some new lash styles that I discovered and can't wait to try out! :D


I'm really excited about these "natural" style lashes with clear lash bands.  I can't wait to see how they look on!


These are new to me...bottom lashes.  They look pretty intense, I hope I'll be able to pull them off!


And of course I love my glitters!


Oh, and look what else!  An eyelash case!  What a great idea, right?  I hate it when I lose my lashes after just one wear...usually because, following occasions where I apply false lashes, I'm a little tipsy (oh, but don't worry, husband is always DD, lol) and my first inclination is to wash up and collapse into bed.  This pretty little case holds up to 4 pairs!  I'm looking forward to being able to organize my lashes and increase their longevity!


Well, that's all I got for tonight!  Hope you guys had fun checking out my new lash stash and have a great Monday night!

Hugs,
Cat

Wednesday, March 28, 2012

Gilded Clash

My posts, about 80% of the time, are pre-planned to some extent or another.  But sometimes, I just do something on the fly and turn it into a review or tutorial.  This is one of those days.  I went into today's tutorial not really knowing what I was going to come up with in the end.  This was the result:


If you'd like to follow along, I'll show you how I did this.  Using my UD Rollergirl Palette, I began by applying Verve to the inner half of my upper primed eyelid:


Next, I applied Darkhorse to the lower outer corner of my upper eyelid:


Then I blended out the outer corner edges with Suspect:


From my UD 24/7 Shadow Pencil Stash, I'm going to grab Clash (an amazing electric-blue with a touch of shimmer) and line my lower lash line:


Then, using my Rehab shadow pencil, I'm going to accent the outer corner of my lower lash line, just outside of Clash:


Next, with black gel/cream eyeliner, I draw a winged line along my upper lash line:


Now I'm going to clean the black gel/cream off my eyeliner brush and I'm actually going to pick up a little Clash right off the pencil, and extend my lower lash liner against my winged line for added drama:


To increase the depth of the look, I'm going to apply some matte black shadow to the outer corners of my eye:


I'm going to finish the look by accenting my winged line with Sephora gold glitter eyeliner:


Curl lashes, apply mascara, and I'm all set!


Overall look:


I actually wear this look often (minus the glitter).  I enjoy the juxtaposition between neutrals and a pop of color, jazzed up with some sparkle.  Hope you all had fun following my little off-the-cuff experiment!

Happy Tuesday and good night!

Hugs,
Cat

Monday, March 26, 2012

Glitter Pug

Feeling a little under the weather, but still wanted to look pretty so I did a simple-yet-sparkly look using Pug shimmer cream shadow by Buxom as well as Sephora silver glitter liner:


To start, I appy Pug all over my top eyelid:


Next, I line my bottom lid with black pencil liner:


Then I soften the liner with a little more Pug:


With black cream eyeliner, I draw a defined wing along my top lash line while redefining my lower lash line:


For more depth, I'm going to apply a little matte black shadow along the outer corners of my eye:


Then I'm going to enhance my top winged line with Sephora's glitter eyeliner in Silver:


Curl lashes, add mascara, and I'm all set to go!


Overall look:


Totally not wearing the right colored shirt for the makeup.  Oh well, haha.  Does this lippy look familiar?   I wore it in the last post when I got my haircut.  If anyone's interested, it's WnW Wild Shine Lipstick in 928 Fierce.


It's a glossy lipstick that's packed with shine.  I like the smooth application and non-drying formula.  As for long-lasting?  Average, but the color is so pretty and for only $2.99, I'm not going to complain!

I'm also wearing a new pressed powder.  I dislike purchasing high-end cosmetics, especially when they're not on sale, but I bit the bullet and purchased a compact of MAC Studio Fix, shown here in C3.  Apparently, that's my color.


Studio Fix is a finely-milled pressed powder that offers excellent coverage over my tinted moisturizer.  Does it work any better than other pressed powders I've used in the past?  Not necessarily, but I did get a glowing compliment from a stranger today asking me how I get my complexion to look so flawless.  Sigh.  I guess hearing something nice did increase my opinion of this product, lol.  I'm going to have to try it out for at least a few more days before I can form an honest opinion, but so far, so good.  Set me back about $30 though.  Ouch!

Well, that's all for today!  I've been working on something kinda cool.  Looking forward to posting it soon. :D  Happy Monday and have a good night!