Wednesday, October 29, 2014

Lashes & Liner

Simple, black, ombre, cat eye liner to showcase Eazy Duz It mink lashes by Luxy Lash.


Eazy Duz It's crisscross design, volume, and length make them very dramatic lashes, yet they're incredibly lightweight, feels like I'm not wearing lashes at all! The liner design that I paired with these lashes is easy to do, yet looks very dramatic, requiring very few products. I'm considering making a tutorial/pictorial for it.

Products used:
  • Etude House Drawing Eye Brow Pencil in Dark Gray and gel eyeliner in Black
  • Sephora black pencil eyeliner
  • Kate Super Sharp liquid eyeliner pen in BK-1
  • Eazy Duz It mink lashes by Luxy Lash
Happy hump day everyone! :D

Hugs,
Cat

*This post contains commercial samples provided by the manufacturer for the purpose of review.

Saturday, October 25, 2014

Nude & Gold Glitter Mani

Heading out for the first Saturday night in a long time, so I did a nude mani with some gold, glittery tips. I love nude polish, it's so clean, classy, and versatile. However, I gave them a bit of a glam twist by adding a gold, glitter gradient. Ta-da! Easy peasy. Used the same technique as I did with the Halloween Disco Nails. Pretty much the only mani that I know how to do, but I like it!


Products used:
  • Seche Clear base coat
  • Zoya Shay polish (nude with subtle shimmer and a hint of pink)
  • Sally Hansen Insta-Dri polish in Go For Gold
  • Wet N Wild Mega Rocks polish in Waiting For My Solo
  • Seche Vite top coat
Happy Saturday, all!

Hugs,
Cat

Friday, October 24, 2014

Eye Wear Lashes Co

TGIF everyone! I'm sure we're all ready and excited for the weekend!

Anyhoo, I'm excited to share a new brand of luxury lashes with you all! They're called Eye Wear Lashes and they make some really beautiful products. You can tell that a lot of care was taken into consideration from the product to the packaging.

The ethically sourced mink lashes are luxuriously dense while remaining graceful and lightweight. The unique, cylindrical packaging has a python texture with shiny, gold print and is secured with a thick, satin ribbon. I love that each lash is attached with a thin, plastic tab to make removal from the packaging easy and convenient.

Here is a simple, ombre cat eye that I did featuring a style called "Flawless".


Products used for this look:
  • Etude House eyebrow pencil in Dark Grey
  • Etude House gel eyeliner in Black
  • Urban Decay shadow in Blackout
  • Makeup Geek pigment in Utopia
  • Eye Wear Lashes Co mink lashes in Flawless
Hope everyone is having a fine Friday, so far! Until next time. :D

Hugs,
Cat

*This post contains commercial samples provided by the manufacturer for the purpose of review.

Wednesday, October 22, 2014

Navy Blue and Teal Glitter Mani

I call this one the Midnight Sorceress! :D I know I've been sharing a lot of Halloween-inspired makeup, so I wanted to add some festive nail designs in the mix as well.


This is pretty much the same technique that I use for my other glitter gradients. See my Halloween Disco Nails tutorial.  However, the lighter part of the gradient begins at the cuticle of the nail as opposed to the tips.

Products used:
  • Revlon Moon Candy polish in Galactic
  • Orly nail polish in It's Up To Blue
  • Wet N Wild Mega Rocks polish in Slap The Bass
More Halloween-inspired nail looks to come, so stay tuned!

Hugs,
Cat

Tuesday, October 21, 2014

Soft Rose Gold Smokey Eye Tutorial

Here's a rare, wearable look for special occasions, weddings, evenings, or even during the day. I love rose gold and I think it's especially appropriate during the autumn season.


Products/Instructions:
  1. apply Bronze L'Oreal Lacquer Liner in an arc in the crease with an eyeliner brush
  2. blend out with Bdellium Tools Pink Bambu pencil brush
  3. apply Urban Decay Dark Horse over blended liner
  4. apply Colourpop Cosmetics Amaze to lid
  5. apply Eyeko Eye Do eyeliner to upper lash line
  6. apply Urban Decay Creep to outer corner using pencil brush
  7. line lower lash line with black eyeliner pencil and smoke out with Smog using pencil brush
  8. apply Stila Magnificent Metals in Kitten to center of lid
  9. curl lashes, apply mascara, and apply Luxy Lash Goal Digger eyelashes
That's all there is to it! Feel free to adjust products or techniques to best suit your style!

Hugs,
Cat

Saturday, October 18, 2014

Pixie Hearts Halloween Jewelry

I've been meaning to share this sweet little jewelry collection with everyone! Pixie Hearts is a California-based jewelry shop that offers cute, original designs that are hand made personally by the artist. There are many adorable pieces available for every occasion! Since Halloween is coming up, I chose these lovely earrings which inspired me to do my jack o lantern makeup a little while back:


She also does some super-cute, custom pet tags, which I'm getting next for my pups! Make sure you check out her work! :)

Hugs,
Cat

Wednesday, October 15, 2014

Rose Gold Glitter Cut Crease

Really quick post today! Just wanted to share a glittery cut crease that I did today. I chose a rose gold theme and Eye Kandy Cosmetics had the perfect color for my look: Taffy. I used the "fine" texture as opposed to the "superfine" to get as much sparkle as possible. This is a fantastic look for autumn due to the warm, rosy hue. Also good for fall/winter weddings for brides that are more dramatically inclined.

I also played around with a fake, dramatic brow by filling in my brows with L'Oreal Lacquer Liner in Bronze and then sketching in brow hairs using Eyeko Visual Eyes liquid pen liner in Mocha.


Products used:

  • L'Oreal Lacquer gel liner in Bronze and Eyeko Visual Eyes eyeliner in Mocha for brows
  • Urban Decay Primer Potion in Eden
  • L'Oreal Lacquer gel liner in Bronze and Urban Decay Naked 3 in the crease as well as lower lid
  • Eye Kandy Cosmetics Taffy glitter (fine "F" texture) on the lid as well as a matching shade of rose gold from Naked 3
  • Eyeko Eye Do eyeliner
  • Luxy Lash "Woke Up Like This" eyelashes
I don't have a video tutorial for a cut crease at the moment, but if you'd like to see one and can't wait, I would recommend JLINHH and Glam&Gore on YouTube.

Happy hump day and thanks for reading!

Hugs,
Cat

Tuesday, October 14, 2014

Halloween Disco Nails!

Cosmetics are my cup of tea, but I also dabble in nail art, occasionally. That is, I either can paint my nails one color OR I sometimes do this gradient glitter thing that looks pretty impressive for how easy it is to do. You just need a little time and patience, but it's not that difficult at all.

Since Halloween is coming up, I decided to go for a fun, glittery party look that is still in the spirit of the holiday, but not too over-the-top.


Products used:
  • Seche Clear base coat
  • Julep polishes in Jet (black) and Tatiana (sparkly pumpkin) from my recent Julep beauty box
  • Wet N Wild Megarocks glitter polish in Waiting For My Solo
  • Seche Vite Top Coat


Technique:
  1. Starting with dry, clean nails, apply base coat.
  2. Next, apply 1-2 coats of black nail polish.
  3. Apply 1 coat of Seche Vite and let dry.
  4. Using a cheap, makeup sponge wedge, sponge the orange polish onto half of nail. Make sure the application is heaviest at the tip and fades out towards the center.
  5. Apply the glitter polish to the tips and dot glitter bits sparingly no further than center of nail in order to achieve the gradient look.
  6. (optional step) Put a generous drop of glitter polish onto a piece of wax paper. Using a toothpick, carefully pick up bits of glitter and strategically place onto nails in order to suit your design.
  7. Finish with another coat of Seche Vite.
Since you all now know how to do this, you can pretty much do it in any color! :D I hope these instructions were clear! I'm considering a video tutorial in the future. Just have to find the time! Thanks for reading and for putting up with al my Halloween-inspired posts! lol

Hugs,
Cat

Monday, October 13, 2014

Princess Jasmine Mint & Gold

So, this was just supposed to be a mint and gold glitter cut crease look, but a few of my Instagrammers mentioned that it looks like a Princess Jasmine inspired look. I completely agree, so, here it is!


Products used for this look:
  • Etude House Drawing Eye Brow pencil in Dark Grey
  • Urban Decay Primer Potion in Eden
  • Urban Decay Naked palette, Eldorado liquid liner, and Midnight Cowboy glitter liner in the crease
  • Royal Care Cosmetics gel eyeliner in Mermaid Green
  • Siren Cosmetics pigment in Heartbreaker
  • Eyeko Eye Do eyeliner in Black
  • ColourPop eyeshadow in Get Lucky on the lower lash line
  • Born Pretty eyelashes in 13523
I guess I'll put this in the Halloween makeup inspiration as well! Hope everyone's start of the week is going well. Thanks for reading and stay tuned for the next post! <3

Hugs,
Cat

Saturday, October 11, 2014

Teal Glitter Ombre Heart Eyeliner

Well, that's a mouthful, but it is what it is.

I've been spending a bunch of time on Instagram and Pinterest and get so inspired by all sorts of makeup looks. Awhile back, I saw a makeup artist mask out a little heart in her eyeliner which I think is charming and whimsical as heck! I've been masking shapes into my makeup from time to time, since.


The shape-making is easier than it looks. I purchased a bunch of nail decals from a shop called Beyond The Nail. I strategically place the decals on my eyelid, apply makeup, and then use tweezers to carefully peel off the decal once I'm finished. Voila! Cute little cutouts in your makeup!

Products used for this look:
  • Etude House Drawing Eye Brow pencil in Dark Grey
  • Urban Decay Primer Potion in Eden
  • Eyeko Eye Do eyeliner in Black, Visual Eyes eyeliner in Marine, and Making Eyes eyeliner in Blue Teal
  • ColourPop eyeshadow in Get Lucky on the lower lash line
  • Siren Cosmetics pigment in Europa
  • Eyekandy Cosmetics glitter in Spearmint
  • Eyemimo GLM13 eyelashes
Hope everyone is having a fantastic Saturday! As always, thanks for reading! <3

Hugs,
Cat

Thursday, October 9, 2014

Eyeko

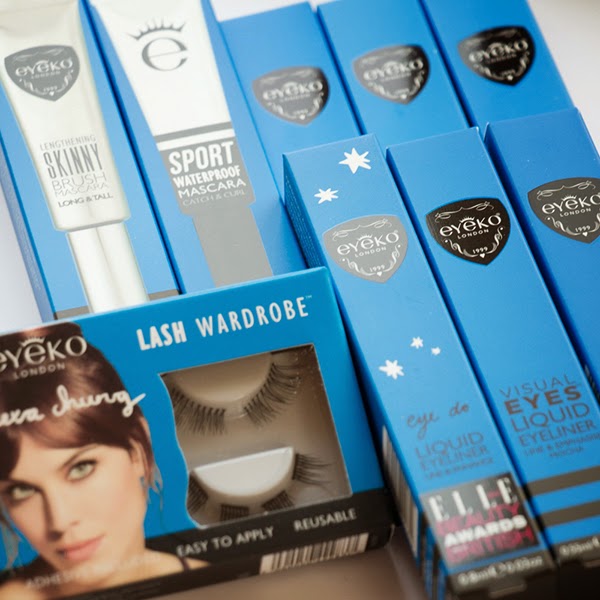
Hi everyone! I'm so excited to have received an amazing Eyeko haul in the mail the other day! If you're not familiar with them already, Eyeko is a luxury makeup brand based out of London. They're well-known for their award-winning, celebrity endorsed products...most notably their eyeliners and mascaras!


Included in my lovely little package are some liquid pen eyeliners, including their award-winning Eye Do eyeliner, as well as some newly launched products, such as their Making Eyes Automatic Gel eyeliners, Sport Waterproof mascara, and Alexa Chung Lash Wardrobe set. Isn't the packaging absolutely charming? There's a bit of a nautical feel to it, I think. :D

Anyways, it was a no-brainer for me to try out their Eye Do liquid pen eyeliner first. I decided to do a simple, neutral cut-crease in order to emphasize the eyeliner:


Products used for this look:
  • Etude House Drawing Eye Brow pencil in Dark Grey
  • Urban Decay Primer Potion in Eden
  • L'Oreal Lacquer gel eyeliner in Bronze and Urban Decay Naked Palette in the crease and lower lid
  • ColourPop eyeshadow in Get Lucky and Stila Magnificent Metals in Kitten on the lid
  • Eyeko Eye Do liquid eyeliner pen on top and bottom lash line
  • Luxy Lash mink eyelashes in Woke Up Like This
I haven't had a chance to try the other products yet, but I must say that Eye Do is one of the blackest, most pigmented liquid eyeliner pens I've ever used. It has a precise, comfortable felt tip which the product flows out of smoothly without skipping or drying, which is something I seldom, if ever, experience with felt-tip eyeliner pens. I also love that I can use it on my waterline. Fantastic stuff! I can definitely recommend this product, for sure!

Looking forward to trying the other Eyeko items and giving you guys the scoop on them! Stay tuned for my next post!

Hugs,
Cat

*This post contains commercial samples provided by the manufacturer for the purpose of review.

Wednesday, October 8, 2014

Halloween Makeup Ideas

Halloween is just around the corner so I've been experimenting with magically festive looks for this famously spooky holiday! (my favorite, by far!)

I've posted all the minute details to my Instagram account, but here is a sparkly, Jack-O-Lantern inspired look with a dramatic, triple-wing:


And here is a shimmering, blue look whose focal point is a little star shape masked out on the lower lid:


Hope this gives some of you ideas for fun looks for Halloween! As for blogging, I've got a ton of cool stuff backed up, so I'm trying to catch up on all of my social media platforms! I feel bad just concentrating on Instagram, so I'm earnestly trying to work on it!

Thanks to those of you who are still sticking around and I'll be back with the next post, ASAP! :D

Hugs,
Cat