One of my favorite ways to relax is to get a pampering mani-pedi. So, a few days ago, I went to a fantastic nail spa located in Oakland called Aveida. For those of you who may live in the area, it's a beautiful, relaxing space with friendly and skilled technicians. They also offer complimentary beverages, such as water, wine, tea, hot cocoa, etc., which I find to be a nice touch. For the month of July, they're running a Yelp check-in special: when you purchase a spa pedicure, you get a free manicure!
This is very exciting. What's more exciting, however, is that I decided to get an upgrade for a Gelish manicure. What is Gelish? It's a gel-based nail polish that takes only seconds to completely dry under LED or UV lighting when applied and remains perfectly glossy and chip-free for anywhere between 2-4 weeks.
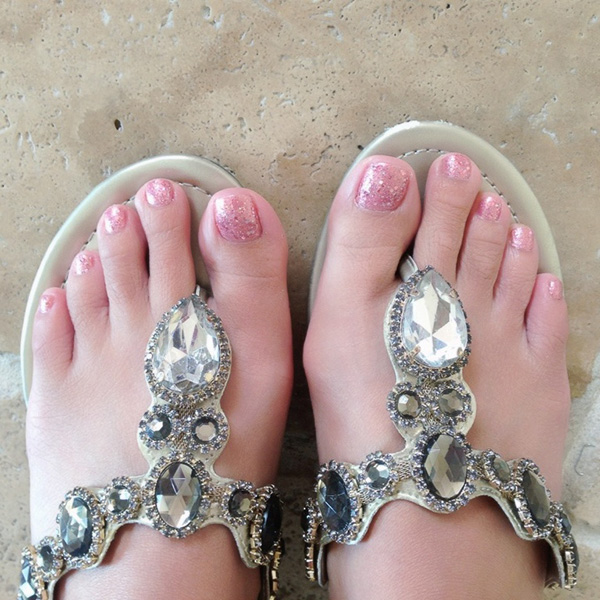
Whoo hoo! Sparkly pink tips! I believe this glittery shade is called June Bride #01353. The ladies at Aveida were kind enough to color match regular polish for my toes as well:
Happy hands and feet! And happy Friday to everyone, too. Enjoy your weekend and thanks for reading!
Hugs,
Cat
Showing posts with label nails. Show all posts
Friday, July 5, 2013
Sunday, November 13, 2011
Amazing manicures by Steffels.
I was exploring Pinterest the other day when I kept noticing that photos of beautiful manicures were popping up all over the place. There was one manicure that was particularly outstanding, however, which lead me to Steffels, an awesome nail blog by a super-talented blogger named Stef.
Ok, I'm officially obsessed. I cannot stop looking through her blog! I know I throw in nail color every once in a blue moon, but this girl has me fiending for some bling on my fingertips! You guys have to check her out, she has some serious manicuring skills. Now I want to buy all the colors that she owns. I'm especially keen on these indie polishes, packed with loads of glittery confetti, by a brand called Lynnderella which I only just found out about yesterday, thanks to Stef. Yay! I'm so inspired! I can't wait to go slap some polish on my nails! :D
Hugs,
Cat
Ok, I'm officially obsessed. I cannot stop looking through her blog! I know I throw in nail color every once in a blue moon, but this girl has me fiending for some bling on my fingertips! You guys have to check her out, she has some serious manicuring skills. Now I want to buy all the colors that she owns. I'm especially keen on these indie polishes, packed with loads of glittery confetti, by a brand called Lynnderella which I only just found out about yesterday, thanks to Stef. Yay! I'm so inspired! I can't wait to go slap some polish on my nails! :D
Hugs,
Cat
Labels:
lynnderella,
manicure,
nail lacquer,
nail polish,
nails,
stef,
steffels
Sunday, September 11, 2011
Review: PA Eternal Nail Stickers by Dear Laura
I obviously had a lot of time today, so I also decided to review the nail decals from my Daiso and Ichiban Kan Haul post.
Since they're a pale shade of shimmery peach, I decided they would go very well with Sally Hansen's Xtreme Wear nail polish in Mint Sorbet.
They're tiny, sparkly little puff paint flowers adhered to a translucent sheet. Cute!
I used a toothpick to gently remove them from the translucent backing and place them on my nails. A cuticle stick probably would have worked very well also, but I didn't have one at the time.
Since I have small hands and fingers, I thought decorating every nail would be a little overkill, so I scattered them sparsely and randomly on 3 nails per hand.
Fast, easy, and salon quality look for under $5! Love 'em! :D
Since they're a pale shade of shimmery peach, I decided they would go very well with Sally Hansen's Xtreme Wear nail polish in Mint Sorbet.
They're tiny, sparkly little puff paint flowers adhered to a translucent sheet. Cute!
I used a toothpick to gently remove them from the translucent backing and place them on my nails. A cuticle stick probably would have worked very well also, but I didn't have one at the time.
Since I have small hands and fingers, I thought decorating every nail would be a little overkill, so I scattered them sparsely and randomly on 3 nails per hand.
Fast, easy, and salon quality look for under $5! Love 'em! :D
Tuesday, August 16, 2011
Review and Tutorial: Sally Hansen Salon Effects in Laced Up
Do you guys remember the Minx nails craze? I think all the big celebrities were sporting them for awhile. Apparently they're nail strips that come in a variety of colors and patterns, are applied with heat, and are supposed to last up to two weeks. Of course, they can only be applied by a licensed beauty technician in a salon and you can expect to pay upwards of $40 for a Minx salon manicure. Boo! Tempting, but too expensive for me!
Well, a bunch of companies came up with products that give you the same look at a more affordable price. I've seen a bunch of nail polish strip kits anywhere from Sephora to ModCloth, but while at CVS the other day, I decided to pick up one of the Sally Hansen brand kits. Cost me about $10. Generally more than I like to pay for nail products, but a heck of a lot cheaper than $40. I love DIY.
I thought this was the prettiest one on display, it's called "Laced Up". It's basically a nude nail color with an allover black lace netting pattern for sort of a lingerie effect. It comes with 16 nail color strips, a cuticle stick, a mini nail file plus buffer, and instructions.
Start with clean hands and nails. If you have nail polish on (like I did prior to application) thoroughly remove nail polish and wash hands. You want them oil and debris free so that the nail strips will adhere to your nails properly. The instructions suggest buffing your nails and pushing down your cuticles to enhance application and adhesion. I forgot to do both steps. Oops!
The strips come in a variety of shapes and sizes. Find the size that's right for each nail. My nails are unusually narrow, therefore most of the sizes were too wide. No worries, I just trimmed them to the correct width with a pair of scissors prior to application.
Once I choose the strip I want to use, I peel a clear film off the front of the nail strip as well as the adhesive backing behind it.
The nail polish strip itself is very flimsy, so take care when handling. It's actual nail polish paint in strip form. The box even says to throw away open and unused strips because they dry out fast! I apply the strip to my nail, pressing firmly to smooth.
Then I fold the excess over the edge of my nail and sort of fold it under to form a crease along the edge.
Using the file, I file away at the edge until the excess breaks off, forming a smooth finish over the edge of my nail. I repeat this process for the rest of my nails.
My thoughts are that Salon Effects are easy to apply, and if you choose an intricately patterned design, like I did, you don't have to worry about making mistakes because they're easily hidden. I had a few wrinkles in some of them and no one notices, including myself. This product is fun, relatively inexpensive, and it's hassle free because you don't have to worry about spills or drying time. I'm not sure about lasting power. I'll try them out for a week or so and will post an update on how they've held up. To remove, simply use nail polish remover.
Well, a bunch of companies came up with products that give you the same look at a more affordable price. I've seen a bunch of nail polish strip kits anywhere from Sephora to ModCloth, but while at CVS the other day, I decided to pick up one of the Sally Hansen brand kits. Cost me about $10. Generally more than I like to pay for nail products, but a heck of a lot cheaper than $40. I love DIY.
I thought this was the prettiest one on display, it's called "Laced Up". It's basically a nude nail color with an allover black lace netting pattern for sort of a lingerie effect. It comes with 16 nail color strips, a cuticle stick, a mini nail file plus buffer, and instructions.
The strips come in a variety of shapes and sizes. Find the size that's right for each nail. My nails are unusually narrow, therefore most of the sizes were too wide. No worries, I just trimmed them to the correct width with a pair of scissors prior to application.
Once I choose the strip I want to use, I peel a clear film off the front of the nail strip as well as the adhesive backing behind it.
The nail polish strip itself is very flimsy, so take care when handling. It's actual nail polish paint in strip form. The box even says to throw away open and unused strips because they dry out fast! I apply the strip to my nail, pressing firmly to smooth.
Then I fold the excess over the edge of my nail and sort of fold it under to form a crease along the edge.
Using the file, I file away at the edge until the excess breaks off, forming a smooth finish over the edge of my nail. I repeat this process for the rest of my nails.
My thoughts are that Salon Effects are easy to apply, and if you choose an intricately patterned design, like I did, you don't have to worry about making mistakes because they're easily hidden. I had a few wrinkles in some of them and no one notices, including myself. This product is fun, relatively inexpensive, and it's hassle free because you don't have to worry about spills or drying time. I'm not sure about lasting power. I'll try them out for a week or so and will post an update on how they've held up. To remove, simply use nail polish remover.
Subscribe to:
Posts (Atom)


