Monday, August 22, 2011

Seaside Summer

I live in a sleepy, seaside town with many sweeping views of the San Francisco bay.  Summers are mild with temperatures usually in the high 60's to low 70's.  I always fold up a light sweater in my bag just in case, lol.  Not all parts of California are sunny and warm in the summer.


Sunglasses - Prada
Tank and Cardigan - Hollister
Skirt -YesStyle
Bag - Dior 
Boots - Two Lips


These sunglasses were from Prada's spring collection a few years ago.  I love the "butterfly" shape!
Dior Vintage Flowers is one of my all-time favorites from their past collections.  The taupe logo is subtle and the bright floral embroidery really stands out.  So girly!

I love these boots!  I call them my "Final Fantasy" boots because they look like they belong to the stylish, world-weary warrior that I wish I was.  I adore the deliberately aged leather look and filigree buckle details.
Meet Daisy, my silly, fox-faced Yorkie.  She loves cuddles more than any other dog I know.

Antique Key Necklace by Lovelina
All photos by Tetraeon Light Industries.

Sorry about the super-long, image-laden post, but there were so may photos that I wanted to share, it was hard whittling them down to just 10.  Lol.  Hope everyone is having a great Monday so far! :)

Hugs,
Cat

Saturday, August 20, 2011

Basic Skincare

*First, let me apologize for being AWOL these past couple of days.  I've been busy trying to reach a jewelry deadline and, in addition to that, both of my sisters had the bad taste to be born on consecutive days, therefore I've been busy birthday-partying this week.  But, moving on to our subject...skincare.

The makeup application process can be fun, creative, and transformational.  However, a healthy complexion is crucial to making good makeup GREAT makeup!

no-makeup me!
I get a lot of friends and family asking me about my skincare regimen.  I admit that I've been granted some decent genes, but I didn't always have clear, healthy skin.  I wasn't invulnerable to acne breakouts during my teen years and was still plagued by a zit or two once in awhile as a young adult.  Since then, however, I maybe get one pimple every year or so.  There were changes I had to make in order to have the complexion that I have right now.  What I'm about to tell you is probably nothing you haven't heard before.

Good skin starts from the inside.

1. Hydrate yourself.  Drink plenty of water throughout the day.  Our bodies are mostly made of water, so what better way to replenish ourselves than to drink it?  Growing up, soda used to be my beverage of choice.  When I was thirsty, I would have a Coke.  I still have a soda every now, mostly at social gatherings, but these days I'm drinking plenty of water.  Making that switch a few years back made a noticeable difference in my complexion.


2. Skip the junk and try incorporating fresh fruits and veggies in your diet more often.  I used to eat McDonald's and Jack In The Box at least twice a day.  No wonder I had so many breakouts!  These days I find myself voluntarily consuming salads and veggies.  I LOVE apples and grapefruit.  I eat grapefruit every day.  Not only is it good for my digestion, but they're so tart, sweet, and juicy...eating a grapefruit is like having a big, refreshing drink of water.


A clean face is a happy face.

Wash your face in the morning after you wake up and at night before you go to sleep.  Seems like a no-brainer, but it's surprising how many ladies actually don't follow this rule.  I know girls that fall asleep with their makeup on and figure that getting a little water splashed on their face from their shower counts as a proper cleansing.  Imagine all the crud that builds up on your face from oil and makeup!  There isn't a more surefire way to clog your pores than to not wash your face properly. 

In the morning, I like to use facial cleanser while showering.  I may as well because I'm in there anyway, right?  My morning facial cleanser of choice is Neutrogena Deep Clean Invigorating Foaming Scrub.  It has exfoliating particles that scrub my face clean of dead skin cells, leaving me with smooth, fresh skin.  As a bonus, it delivers a cool, tingly sensation that feels great and really wakes me up!


In the evening, after removing my eye makeup, I like to gently cleanse with Christal Clear Aloe Foaming Face Wash.  It's really gentle and leaves my skin feeling clean and soft.  It's also very slightly scented with the fragrance of chamomile which I find very calming before I go to sleep.


Moisturize...and don't forget the sunscreen!

The first thing I do after I step out of the shower is moisturize my face.  My face is what people see when they look at me, so I always want it looking its best.  I have dry skin, so as soon as I get out of the shower, I want to seal in that moisture right away by applying a layer of moisturizer with built-in sunscreen.  My morning moisturizer of choice is Olay Complete Defense UV Moisturizer.  UV protection is critical to my skincare regimen because of it's anti-aging and cancer preventative qualities.  Hey, I'm game to stave off wrinkles, liver spots, and melanoma for as long as I can...preferably forever.


In the evenings, after facial cleansing and before I go to sleep I apply Neutrogena's Light Night Cream all over my face and neck.  It's lightweight, fragrance free, doesn't clog pores, and absorbs quickly, leaving my face feeling soft, supple, and clean from the moment my head hits the pillow until I wake up the next morning.


Those are the basics.  I hope this post has been helpful.  Feel free to leave any additional tips, comments, or suggestions. :)

Hugs,
Cat

Tuesday, August 16, 2011

Review: Wet N Wild Megaliner Liquid Eyeliner in Black

While at the drugstore, I also picked up a bottle of Wet N Wild's Megaliner.  Liquid liner is my first choice for opaque, clean lines and at $2.99 apiece, I just couldn't resist.


I like the long handle and brush tip because I feel like I have more control and am able to make smoother, more precise lines.  My only gripe is that I wish the brush tip were just a touch finer.  But for the price, I can't complain.


I started with my eye already made up.  I did a simple look with outer V shading in neutral bronze/browns.  Here I'm using Urban Decay's Midnight Cowboy, Chopper, and Smog along with some smudged black pencil liner.  This is a really great work/daytime look.  Let me know if you guys would like a tutorial. :D

Using the Megaliner, I sweep a winged line along my upper lid and trace a tapered line halfway in from the outer corner of my bottom lid for depth and drama.


I curl my lashes and add mascara to finish.


From prior experience, I know that this eyeliner isn't waterproof and it may smudge a little after over 8 hours of wear.  The formula applies very smoothly, however, and doesn't crack or flake once it's dry.  As long as you're not using it in the pool or sweating up a storm in the gym, this is a great alternative to more expensive liquid liners that could cost you more than 5 times as much.  I think there's a waterproof version too, which I'd like to try.  Stay posted for an upcoming review on it.

Review and Tutorial: Sally Hansen Salon Effects in Laced Up

Do you guys remember the Minx nails craze?  I think all the big celebrities were sporting them for awhile.  Apparently they're nail strips that come in a variety of colors and patterns, are applied with heat, and are supposed to last up to two weeks.  Of course, they can only be applied by a licensed beauty technician in a salon and you can expect to pay upwards of $40 for a Minx salon manicure.  Boo! Tempting, but too expensive for me!

Well, a bunch of companies came up with products that give you the same look at a more affordable price. I've seen a bunch of nail polish strip kits anywhere from Sephora to ModCloth, but while at CVS the other day, I decided to pick up one of the Sally Hansen brand kits.  Cost me about $10.  Generally more than I like to pay for nail products, but a heck of a lot cheaper than $40.  I love DIY.


I thought this was the prettiest one on display, it's called "Laced Up".  It's basically a nude nail color with an allover black lace netting pattern for sort of a lingerie effect.  It comes with 16 nail color strips, a cuticle stick, a mini nail file plus buffer, and instructions.


Start with clean hands and nails.  If you have nail polish on (like I did prior to application) thoroughly remove nail polish and wash hands.  You want them oil and debris free so that the nail strips will adhere to your nails properly.  The instructions suggest buffing your nails and pushing down your cuticles to enhance application and adhesion.  I forgot to do both steps.  Oops!


The strips come in a variety of shapes and sizes.  Find the size that's right for each nail.  My nails are unusually narrow, therefore most of the sizes were too wide.  No worries, I just trimmed them to the correct width with a pair of scissors prior to application.


Once I choose the strip I want to use, I peel a clear film off the front of the nail strip as well as the adhesive backing behind it.


The nail polish strip itself is very flimsy, so take care when handling.  It's actual nail polish paint in strip form.  The box even says to throw away open and unused strips because they dry out fast!  I apply the strip to my nail, pressing firmly to smooth.


Then I fold the excess over the edge of my nail and sort of fold it under to form a crease along the edge.


Using the file, I file away at the edge until the excess breaks off, forming a smooth finish over the edge of my nail.  I repeat this process for the rest of my nails.


My thoughts are that Salon Effects are easy to apply, and if you choose an intricately patterned design, like I did, you don't have to worry about making mistakes because they're easily hidden.  I had a few wrinkles in some of them and no one notices, including myself.  This product is fun, relatively inexpensive, and it's hassle free because you don't have to worry about spills or drying time.  I'm not sure about lasting power.  I'll try them out for a week or so and will post an update on how they've held up.  To remove, simply use nail polish remover.

Monday, August 15, 2011

Review and Tutorial: Forest Fury

I usually like to keep things super simple as far as tutorials, but today's look is going to require a few more than 3 steps.  Don't worry, it's still easy and the results are totally worth it.  Check it out:


So I was at the CVS a couple days ago and, as usual, I came in for some sort of necessity but ended up being completely distracted by the makeup aisle.  A display of mini eyeshadow palettes immediately caught my eye.  Apparently, Maybelline's EyeStudio collection came out with a new product called Color Explosion, which is a palette of 4 brightly pigmented shades plus a sparkling shimmer topcoat.  The packaging was so pretty and the colors were outstanding.  They were also BOGO half off, so I ended up taking these two home with me:

Maybelline EyeStudio Color Explosion in Forest Fury and Amethyst Ablaze

I decided to try the Forest Fury shadow palette first, which brings me to the look we're doing today.


As always, I start with a primed eyelid.


Next, I apply the peridot shade to the inner half of my eyelid, just shy of the brow bone.


Using the silvery sage green color, I shade the outer half of my eyelid.


Once I complete that step, I'm going to use the light gold shadow to highlight my brow arch, while using the emerald green shade to darken the outer corner of my crease.


Then, I'm going to line the inner corner of my lower lid line with gold eyeliner pencil while lining the outer corner with black eyeliner pencil.


I layer the light gold shadow over the gold eyeliner and the emerald green shadow over the black eyeliner for a shimmery, slightly smoky effect.


To add an extra dimension of depth, I darken the outer corners with black eyeshadow.


Then I line the outer corners with more black pencil eyeliner for even more drama.


For a more blended look, I smudge it a little to soften the lines.


To finish, I curl my lashes and apply mascara.


As you can see, these shadows are extremely vibrant and are true to palette color upon application.  As a result, this look was really fun to do!  It's a really dramatic way of dressing up the eyes and will definitely turn heads.  I would highly recommend these shadows for an evening out.  I didn't apply the shimmer topcoat yet because it's too early in the day, but I'll definitely try it tonight and will post a photo update. :)

Overall look:


Sunday, August 14, 2011

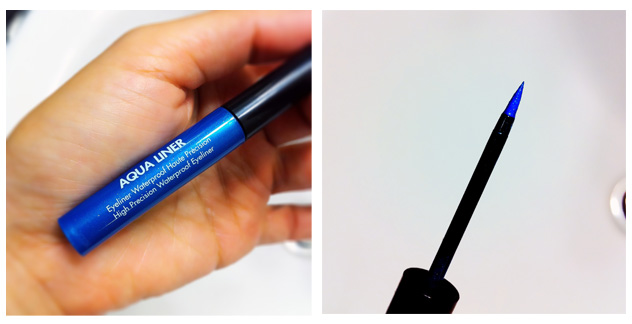
Make Up For Ever Aqua Liner in Diamond Turquoise Blue 5

When I first swatched this on the back of my hand at our local Sephora, the color just took my breath away.  It was the most vibrant, shimmery shade of turquoise blue I had ever seen in a cosmetic product!  Even my husband, who is relatively unaffected by makeup, said that the color was "cool", which says a lot.    Of course, I wasn't there to buy, just to browse.  Besides, for $23 a pop, it was waaaaaaaaaaaay over my budget for eyeliner.  BUT, after about a week of not being able to get it out of my head, I caved and bought one.  Well, my husband, who loves me too much, bought it for me.  It was also our anniversary week, so he felt it was somewhat justified.  I heart. :)  He also took these photos of me wearing it:


I love love love it!  The color, is absolutely magnificent.  It's just so darn pretty, I don't know what else to say.  The blue is crazy-pigmented, applies very evenly, and lasts so well that I can't remove it completely at the end of the day with my waterproof eye makeup remover.  Again, as with most liquid eyeliners, I really like how the handle is nice and long for precision application.  The only, only thing I would change is that I would made it a fine brush instead of a felt tip.  Brushes are more flexible, which increases precision, in my opinion.


To get this look I used the same technique as I did with my Woodstock Wings tutorial.  I start out with a primed eye, dusted with a coat of my pressed powder for a smooth, matte look.


Then, using black gel eyeliner, I trace a line on my upper eyelid, extending an exaggerated tail on the outer corner.

Don't worry if it's messy, we'll clean it up later.

I also traced my bottom lid line with black eyeliner pencil.


As always, I layer a little black eyeshadow over the bottom eyeliner to set it and to smoke it a bit.


Using the Aqua Liner, I draw an arc from the inner corner of my upper eyelid to the tip of the extended wing and then fill it in with color.


Using more black eyeliner (your choice of pencil, gel, or liquid) I smooth out the lines to make the entire look a bit cleaner.


Curl lashes and add mascara and I'm done.


Overall look:

Bowrific Necklace by Lovelina