Friday, February 25, 2011

My Vday Presents!

Ok, so I said that I was going to do a style post with the presents that hubby got me for Valentine's Day, but unfortunately, he's been so swamped with work that he hasn't had a single moment to organize a shoot with me. :(  I guess it's a good thing that he's working though, right?  So for the time being, I'm going to have to settle for listing my goodies and doing short commentaries on why I love them.

The Purse:


This handbag was on the top of my wish list!  It is just too freakin' adorable!  I love it so much.  It's even cuter in person than it is in the picture.  It's a nice, medium size.  About 15" wide, 10" high, and 4" deep.  The fabric is a heavy-medium weight ivory twill with navy stripes and the espresso-colored leatherette is buttery soft.  There's a functional faux-buckle pocket on the outside and 3 inner pockets, one of which is zippered.  It also comes with a detachable, longer strap in case you want to wear it longer and it's lined with a super-cute grey cotton lawn fabric with hot pink cupcake print.

It's such an effortlessly classy accessory with a sort of nautical/resort flair to it.  Coincidentally, a girlfriend of mine also happened to purchase this same handbag  at around the same time my honey probably ordered it for me.  We both share an obsessive love for Anthropologie, so it was no surprise to me when I saw her carrying it the other day.  Excellent taste, my friend.

For those of your who are interested, we got this lovely little bag here at Ruche.  Get it while you can!

The Belt:

So I thought I was just getting a handbag, which was perfectly fine with me.  But when I opened it up, I found some other little surprises hidden inside.  This darling belt was one of them.  Isn't it to die for?  The bow is crafted from a deep brown leatherette and has cute eyelet detailing along the edges.  The sides are a wide, lattice design and the back is elastic.  There's a button closure on the front.  This piece is so versatile!  When I first laid eyes on it, the possibilities raced through my mind at a mile a minute.  I'm sooooooooo into vintage-bohemian chic!  This belt would look positively gorgeous on flowy spring and summer blouses and dresses in delicate laces and country floral prints, don't you think?

They're currently sold out here (also Ruche), but if you send in a request, the site owner is really good about restocking in-demand items.

Dress #1:


So simple, but so sexy!  I've always wanted to wear a backless dress and now I finally get to.  I love how the front neckline and the sleeves make this dress appear to be demure, but the body-conscious fit, short length, and low back make it so seductive.  I tried it on with my fav pair of black pumps and felt like a million bucks.  Can't wait to wear it out on a hot date!  You can get yours here at American Apparel.

Dress #2:


This dress is so much fun!  Can you tell by looking at it that I love to twirl around while I wear it?  I feel like a figure skater or ballerina when I have it on.  The flare makes it sweet-looking, but don't let that fool you.  The material is slinky, shiny, and stretchy, the neckline is a low scoop, and the flirty circle-skirt is super-duper short.  HOT!  I have the cobalt (deep blue) shade, but want one in every color now.  American Apparel.

The Bodysuit:


Because of the *very* revealing nature of this bodysuit, I probably won't be featuring a style post about it.  Lol.  It's pretty self-explanatory.  I tried this piece with skinny black jeans, pumps, and a cropped motorcycle jacket and it looked great.  Edgy, with just a touch of harlot.  Love it!  It also comes in hot pink for those of you who are brazen enough to dare.  American Apparel.

Welps, there it is!  Hope y'all enjoyed the post.  I can't wait for the weather to get a little warmer so I can test out some of these outfits.  Any of you ladies down to join me in the city for a girls' night out?  Let me know, cuz I'd be super-excited to go!

Hugs,
Cat

Wednesday, February 23, 2011

Jewelry: New items!

Victorian Romance Pearl Drop Earrings

I've always had a thing for pearls.  There's something about them that's just so classic.  I like sparkly things too, but something about the lustrous shimmer of a pearl is incredibly elegant.  I'm a big fan of period pieces and I made these because they remind me of the beautiful Gibson Girls of the late 19th century.


My Darling Cuckoo Necklace


I love love love this piece!  I'm probably going to wear it out today.  It's all in the details.  The cuckoo clock and the swallow are tiny, yet they're incredibly detailed pieces of art.  I have the pearl wearing a little leafy hat also.  Too adorable!  There's a whimsical vintage-bohemian charm to it that I find irresistible.


Vintage Rose Swarovski Drop Earrings


These crystal drop earrings are just plain pretty!  I used very high-quality Swarovski crystals in a sublime vintage-rose shade.  You can tell by the weight, the facets, and just the way they sparkle in the light that these aren't cheap plastic beads that you would find at Forever 21.  The scalloped bead caps are particularly elegant. They have fine, millegrain detailing that reminds me of the Art Deco period.  I can't wait to wear them to my next dressy event!


Beauty: Moss Goddess

Alright!  Who wants to be the goddess of moss?  Sounds mighty appealing, right?  Well, I was just feeling clever and I like how it rhymes.  I also thought it would be appropriate since I'll be doing a tutorial using earthy green tones as opposed to brights.

The key player in our lesson today is Maybelline's ExpertWear Eyeshadow Quad in Emerald Smokes:


It's a little hard to see in this image, but each color has been conveniently labeled to give you a rough idea of where it should be applied.  Clockwise from the bottom left: Brow Bone, Lid, Crease, Outer Corner.

Other components I'll be using:
  1. large flat shadow brush
  2. medium flat shadow brush
  3. crease brush
  4. small smudge brush
  5. small domed shadow brush
  6. black pencil liner
  7. black liquid liner
  8. black eye shadow
  9. mascara
As usual, I start with a primed eye.


Next, I'm going to use the large flat shadow brush to apply the "lid" color (a medium silver-khaki green) to my eyelid up to the brow bone.


Then, using a small flat shadow brush, I'm going to apply the "brow bone" color (ivory with gold shimmer) to my brow bone (duh) and under-eyebrow-arch area.


Once I've completed this step, I'm going to take my crease brush and apply the "crease" color (medium hunter green) to the outer half of my upper lid, just to the brow bone,  using even, circular strokes.


I'm going to grab my black pencil liner now (HIP Color Chrome) and line my upper lid halfway in from the outer corner.


Using the same pencil liner, I'm going to completely line my bottom lid.


Then, using my small smudge brush, I'm going to layer some of the "outer corner" color (espresso brown with multicolor flecks) right on top of the top lid eyeliner, blending and smudging as I do so.


Next using another smudge brush (or the same one that's been cleaned off), I'm going to layer the "crease" color right on top of the bottom eyeliner.


Then I'm going to take my large flat shadow brush again, and pick up a small amount of the "lid" color.  I'm going to blend it right along the edges of the "crease" color we just applied.  This will give the overall look a softer effect.


Once I've finished doing that, I'm going to use my small domed brush to apply black eye shadow to the outer corners of my upper and lower lids for added depth.


Then, using black liquid eyeliner (Prestige Liquid Glitter Precision) , I'm going to add a moderately winged line to my upper lid line.


I'm also going to add a little just on the outer corner of my bottom lid line.


To finish, I curl my lashes and apply mascara.


And there you have it!  The colors ought to be well-blended so that there are no harsh lines and the final result should resemble a gradient of all the colors we used.  I really like these quads because you have a complementary set of shadows in the same color family which takes the guesswork out of choosing colors to create a certain look.  The pigmentation isn't bad, and the color labeling is useful for those that are new to makeup.  Pricing is reasonable...I think you can find this set for $5 on eBay and about $7-8 at the drugstore.

Because of my very yellow/olive undertones, I find that these shades of green work with my complexion quite well.  
An earthy, subdued green smoke worthy of a woodland nymph. Wheee!

Tuesday, February 22, 2011

Food: Bretel Butter

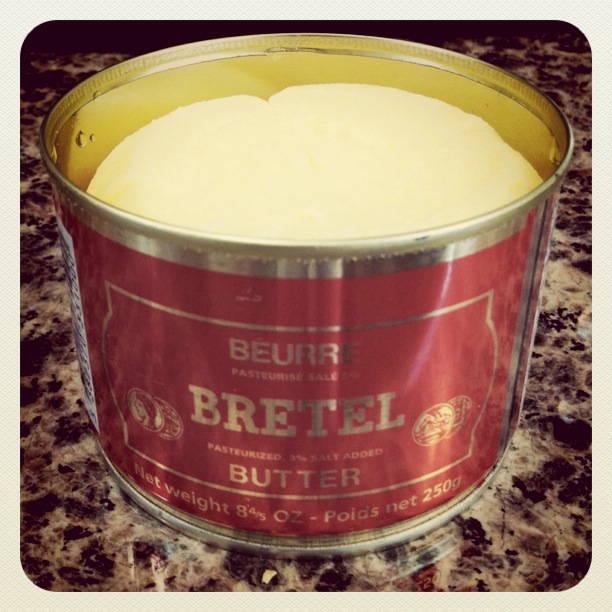
My favorite food is butter. (can that be considered a food?  I suppose it's more of a condiment...)  My favorite butter is Beurre Bretel.  It is, quite possibly, one of the most delicious condiments ever created on earth.  Bretel butter comes in a signature red and gold can.  Imported from France, it is rich, creamy, salty, and has a distinct flavor unlike any butter you will taste.  This is my crack.


If you grew up in a traditional Vietnamese household, then you probably grew up eating this butter with your parents and grandparents.  It's been pretty difficult to find until recently.  Yesterday, I drove 45 minutes to San Jose with my best friend to purchase some from a Vietnamese shopping mall.  It was $9 for heaven-in-a-can.  This morning, I spread a little on my english muffin and the first bite nearly brought tears to my eyes.

I can imagine so many delicious possibilities with my Bretel.  It would be sublime on a fresh, french baguette or maybe a dollop melting on a pan-roasted filet mignon.  Sauteed with chopped garlic and then tossed with pasta and freshly-grated parmesan cheese could be my last supper.

Yum!  I'm soooooooooooo excited!

Happy Birthday Honey!

Ok, so I've been away for a few days, but I swear, I have a good excuse!  We celebrated my husband's 30th birthday over the weekend and I was too busy trying to make it perfect.  Check out the awesome birthday cake my sisters and I commissioned for his special day:


Yep, that's an iPhone cake customized with the exact apps that he has on his home screen.  The artist that created this was Carolyn Wong, who happened to have made our wedding cake last July as well.  It tasted as good as it looked too, filled with vanilla spongecake, chocolate and vanilla buttercream, and chocolate souffle.

This was his birthday present:


No, that's not him, but it's what I got him, which was a skydive.  When he and I first met, we talked about exciting things we wanted to do, like going skydiving.  Well, in my old age, I've developed an aversion to dangerously exhilarating things.  He, on the other hand, is always down for an amazing experience so I thought this would be the perfect gift for him.  It's also probably a good time for us to look into life insurance.  Lol.

Friday, February 18, 2011

Beauty: Pinch of Purple

Finally, another makeup tutorial!  Sorry I've been neglecting the "beauty" section of the blog.  I've been wearing too many hats as of late: student, employee, jewelry designer, blogger, sister, daughter, wife, etc.  It suddenly dawned on me that all this is pretty demanding!  Good thing I have yet to wear the "mom" hat, lol.  We'd be in trouble when that happens!

Ok, so why a "pinch" of purple?  Well, I have *very* yellow undertones and I learned early on that full-blown purple doesn't look the best on me, although I'll probably do a bold purple eye one of these days for fun.  Today, we're going to do a  corner-smoke technique using pretty, subdued shades of violet.  I'm going to deviate from my fav 100 shadow palette and turn to Covergirl's eyeshadow quad in Berries and Cream instead.

I've had mine for at least 4 years now and I love it.  It's easy to find at any drugstore for about $5, give or take a few cents.

Starting with a primed eye, I'm going to apply the second-lightest shade to my eyelid up to the brow bone using a large, flat shadow brush.

Next, I'm going to apply the lightest shade with a medium shadow brush in order to highlight the arch under my eyebrow.

Then, using a crease brush, I'm going to apply the second-darkest shade to the outer corners of my upper eyelid, up to the brow bone, using small, circular strokes.

Next, using a small smudge brush, I'm going to apply the darkest shade to the outer corners of my upper eyelid, stopping just before the brow bone and blending well with the previous shade.

Once I've completed this step, I'm going to take some black eyeliner and, starting with the outer corner of my upper lid, draw a smooth, tapered line to the center of my lid.
Notice how the shading has formed a "v" shape.

Now I'm going to line my bottom lid, however, starting from the outer bottom corner, I'm going to draw a smooth, tapered line all the way to the inner corner of my eye.

Next, with a white or silver eyeliner pencil, (I'm using HIP Color Chrome liner in Silver Lightning) I'm going to line the other half of my top lid from the inner corner to the center.

Once I've done this, I'm going to grab my smudge brush again, pick up some of the darkest shade, and layer it right over the bottom liner, smudging evenly as I do so.

Then, using a small, domed eyeshadow brush, I'm going to smudge and blend some black eyeshadow on the outer corners of my eyes, right on top of my liner, making a small "v" shape. (just like in the basic eyeshadow tutorial)


For the next step, I'm going to take a liquid eyeliner and draw a tapered, modestly winged line starting from the inner corner of my eye and sweeping outward towards the outer corner.
To complete the look, I curl and apply mascara to my lashes.  Here I'm using Maybelline's Full & Soft Waterproof mascara, my favorite in the whole world. (you'll find out why when I do my next product review)
The result is a soft, subtle finish, yet still purple-hued.  Another reason why I wanted to keep things tame was because I headed off to work right after I was done with the shoot.  This makes for a great, dramatic look while being still being daytime-appropriate.