Wednesday, August 31, 2011

Featherweight Face: ELF Tinted Moisturizer plus Matifying Powder

I was at my local Target the other day to pick up some housewares when I came across the ELF shelf in the cosmetics aisle.  With two more ELF orders still expected to ship to me any day now, I really didn't need to buy any more makeup, but I couldn't help myself and picked these up:


No Studio sale AND I had to pay sales tax. :(  But what can I say?  I'm an instant gratification kind of gal. Lol.

I've heard so many wonderful things about ELF's Tinted Moisturizer SPF 20 and Translucent Matifying Powder, therefore I was super-excited to try them out.  I got the tinted moisturizer in Nude, while the matifying powder only came in one color.  I start off with a freshly cleansed and moisturized face:


I begin by applying the tinted moisturizer with my fingertips.


I was very pleasantly surprised at how light the formula was and how it effortlessly melted into my skin, evening out my complexion and blending perfectly with my southeast asian skin tones.


Next, I apply the translucent matifying powder, using my ELF Kabuki Face Brush.


At first, I wasn't sure if the "one shade fits all" color would work for me, but it blended seamlessly with the tinted moisturizer, creating a flawless, photo-ready finish.  The smooth texture also allows for perfect application of eye, cheek, and lip color. :)


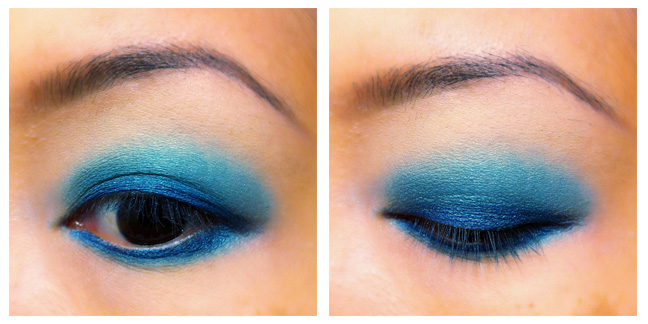
Add eyes, cheeks, and finish with ELF's Studio Conditioning Lip Balm SPF 15 in Nice and Natural and I'm done!

Whoa!  What a difference good makeup makes. Lol.
Seriously folks, this is a fast, easy, 2-step process for a perfect complexion.  I haven't used liquid makeup in over 5 years.  I detest the heavy, greasy sensation of foundation.  It feels like my skin can't breathe.  But ELF's tinted moisturizer and matifying powder combo feels like nothing at all!  

I also have the worst combination skin.  I get flaky, dry patches on my cheeks while my T-zone looks like I polish it with grease.  This problem has now been solved.  The tinted moisturizer keeps my dry spots soft and conditioned, while the matifying powder tames my oily zones with little to no touchups necessary.

BIG bonus: while I already use a moisturizer with sunscreen, the additional sunscreen in the tinted moisturizer gives an extra boost of UVA/UVB protection, hooray!

I think this is it!  I have officially discovered the perfect foundation routine for my face.  Whew!  Hope some of you found this post helpful.  Stay tuned for additional reviews and tutorials. :)

Hugs,
Cat

p.s. The Makeup Remover Cleansing Cloths are AMAZING!  They're super-soft and remove even waterproof eye makeup gently without unnecessary pulling and tugging. (which we all know causes wrinkly, saggy skin...especially around the eyes) They also have a mild, refreshing aloe fragrance that leaves my face feeling fresh and clean.

Tuesday, August 30, 2011

I Love: ELF cosmetics!

One of my favorite beauty brands has to be E.L.F. (eyes lips face)  Even if I'm broke as a joke, I know I'll still look good because I have ELF.  I don't know how they do it, but they provide high quality cosmetics at prices so low you'll LOL.  Pricing for most of their items is between $1-$3...I kid you not.  On top of that, they had a 50% off sale last week.  I think I made 3 separate purchases between last weekend and today.  Here is the first shipment I received, 5 brushes and 5 lip products for about $20...shipping included:


At Sephora or MAC, you'd be lucky to get one item for $20!  (still love those companies though)


I love love love the ELF kabuki brush.  This is the second one I've purchased.  They're soft, attractive (I adore the duo tone) and apply pressed and loose powders perfectly and evenly.  The studio brushes (black) are excellent quality, don't shed, and blend colors extremely well.  The essential brushes (white) are almost as good.  They shed a little sometimes, but at $1 each, I can't complain.


They came out with these cool new automatic lip pencils with built-in blending brushes.  How cool is that?!  Now I have a different brush for different lip colors instead of having to clean my lip brush every time I apply a new shade.  Ingenious!


I got one each in Natural and Fuchsia.  $3 each at 50% off, how could I say no?


I also purchased the Glitter Gloss in Fuchsia Fireworks, a gorgeous fuchsia shade with bluish glitter particles, and Glossy Gloss in Pink Candy, a subtle, silky ballet pink.


I picked up a pot of their Studio Conditioning Lip Balm SPF 15 in Nice and Natural as well.  The texture is soft and luxurious with a hint of creamy color and a coconut scent that reminds me of beach vacations.


I lined my lips with the Natural lip liner and used the built-in brush to soften the lines.  Then I applied the Nice and Natural lip balm over it.  The liner is a little orange-y for a true nude.  I think it would look great with coral and peach lip colors.  The lip brush a bit on the stiff side as well, but still works.  I really can't complain, it's such a great idea.  The lip balm is fantastic!  It lasted through breakfast, lunch, and dinner and kept my lips subtly colored and conditioned all day long.  I'm definitely going to get it in other colors!

Overall look:


Next, I tried the Pink Candy Glossy Gloss over the same lip liner.  The formula is super-shiny, I really like the applicator brush, and it smells like grape jelly, mmm! *correction* my husband says Gushers (remember those liquid-filled fruit snacks from the late 80's early 90's?) I think he's right! :D


Overall look:


Last, but not least, I tried the lip liner and Glitter Gloss, both in shades of fuchsia.  The color of the liner exceeded my expectations, it looked more drab on the website.  The brush on the Fuchsia liner seems softer than the one on the Natural liner. *shrug* Luck of the draw?  I really like the sheer, shimmery, multidimensional color of the fuchsia Glitter Gloss as well, it also smells faintly of cream soda, yum!


Overall look:


Well, that's all for now!  I'm still waiting for two more orders to come in and will definitely post reviews with photos for those products when I get them.  Hope this has been helpful!

Hugs,
Cat

Aquamarine: Wet N Wild Color Icon Blue Tutorial


I've been playing with my Wet N Wild Color Icon palette in Blue Had Me At Hello again and have recently been sporting a simple and sparkly blue look.  I was inspired by a cute film I saw a few years ago about a mermaid called "Aquamarine".


It wasn't a widely released movie, so I'm not sure if many people saw it, but vague memories of it helped me come up with this look.  I start with a primed eye:


Next, I line my top and bottom lid with bright blue pencil liner:


Then, using the teal shade from my palette, I layer shadow over the liner on my top and bottom lid:


After that, using the ice-blue shade, I highlight my brow bone:


Using black pencil liner, I accent the outer corners of my top and bottom lid:


Then I take some of the blue-black glitter shadow and layer it over the black eyeliner:


You can pretty much finish with mascara here, but for extra depth and drama, I add a little Wet N Wild MegaLiner liquid eyeliner to the top and bottom eyelid:


Now, I finish with mascara:


Option to add teal glitter for extra sparkle:


Complete look:

Simply Bowrific Necklace by Lovelina

I've been going out a lot with this eyeshadow look.  It's pretty and only takes a few minutes. :)  Hope y'all found this useful.  Have a great night!

Hugs,
Cat

Monday, August 29, 2011

Wine Country Wedding Weekend

Hiya friends!  Sorry I've been away, but I spent the weekend in Sonoma wine country to attend a dear friend's wedding, thus having no time to blog at all.  It was a beautiful day, lots of sunshine and temperatures in the low 90's.  I've never been up this way before, surprisingly.  It was a gorgeous wedding in a gorgeous setting.  I saw 2 shooting stars that evening.  The night sky was so clear there, unpolluted by excessive artificial light.  I'd never seen so many stars before, never looked through the center of the Milky Way the way I did this weekend.  Needless to say, it was truly inspiring.  Here are some images from the wedding, nothing fancy, just some snapshots from our iPhones.  Enjoy anyway!

I love the way this looks!  Lots of lime, fuchsia, and tangerine...the colors were as bright and fun as the bride and groom.
Hanging out during pre-dinner wine and hors d'oeuvres.
L'il sis and me.
Beautiful centerpieces overlooking a breathtaking view.
The mister looking pensive.
I thought I'd gotten used to being married, but looking at this place card made me feel a little giddy.

Hope everyone's having a great Monday!

Hugs,
Cat

Thursday, August 25, 2011

"In A Heartbeat" Locket Watch

Newest piece from my Lovelina jewelry collection.  I know locket watches are redundant, but I can't help it.  They're so romantic...


Wednesday, August 24, 2011

Tutorial: Neutral Daytime Look with Urban Decay

Most of the looks I do are brightly colored, but sometimes I need a neutral look for more conservative events.


Here I used an old Urban Decay palette I purchased years and years ago.  I don't think this palette exists anymore, but the colors still do.  I used Midnight Cowboy, Chopper, and Smog to create this look.

I start with a primed eye:

UDPP in Eden

I dust the inner half of my upper eyelid, as well as my brow arch, with Midnight Cowboy:


Next, I apply Chopper to the outer half of my upper eyelid:


Then, using Smog, I shade my "crease".  Being a typical asian, I have a very shallow crease, so I fabricate a deeper crease by shading the hollow of my brow bone starting at the outer corner of my upper eyelid and tapering and fading towards the inner corner.


Using a black eyeliner pencil, I draw tapered lines halfway in from the outer corners of both my top and bottom lids.


I smudge and smoke the liner by layering a little black shadow over it in order to soften the look.


I add a modest wing to my top eyelid using liquid eyeliner, adding a little to the outer corner of my bottom lid line to for a more dramatic effect.


Curl lashes and add mascara and I'm done!


I find that this is a great, subtle daytime look for work or school and can easily be drama-tized with more black shadow, a thicker wing, and false lashes for the evening.  Hope y'all found this helpful.  Have a happy Wednesday!

Hugs,
Cat