
Monday, January 31, 2011
Style: The Secretary
Since I didn't want my Quorra eyes to go to waste yesterday, I decided to play dress-up so that I could make a new style post. I am so grateful to have a husband who is an immensely talented photographer as well as having the patience of a saint. Despite the fact that he had a million important things to do, he still set everything aside to make time for me. Heart heart heart!
So I threw a bunch of stuff together and ended up creating sort of a vintage-inspired secretary look. Reminds me a little bit of Mad Men, don't you think?

The top, from Forever 21, is a red and black plaid button-down blouse with a self-tie neck sash that you can fashion into a nice big bow. The bottom, from Sway boutique located in Alameda, is a black pencil skirt with ruche detailing at the waist and faux welt pockets. I'm wearing control-top nylons to keep everything tucked-in and slim looking, and, of course, proper ladies don't leave the house in a skirt without stockings on, right? (cue the mild sarcasm)
The shoes are my favorite part of the outfit! They're a hidden-platform pump in deep black with a luxurious, velvety texture. It's from a cheap-o brand called Qupid and I got mine online at Kmart for about $30. They're actually pretty well-made for the price and surprisingly comfortable for such a high heel. Whodathunkit? They're so gorgeous and versatile. I imagine you can wear them with jeans as easily as you can wear them with a cocktail dress. Grab a pair here before they're gone: Qupid Platform Pump
And last, but not least, the black, feathered birdcage fascinator I'm wearing comes from Hot Topic.

Unfortunately, aside from the shoes, my outfit is no longer available for sale because I bought all the pieces separately anywhere from 1-2 years ago. However, I don't think comparable items would be difficult to find.
In any case, hope you enjoyed the style post!
Hugs,
Cat
Sunday, January 30, 2011
Beauty: Quorra Eye Makeup
So I've been dying to do this post for over a month now, but couldn't really get around to it until I got all the basics out of the way. I figure as long as we've got the basics down, we can pretty much modify them to get any look we want.
Those of you that know me probably know that I'm a fan of Tron. Thus, when Tron: Legacy premiered, I was absolutely ecstatic. It's one of my favorite films of all time. I'm not going to argue about plot, acting, dialogue, etc. I love it because I love it, period.
And as much as I love Tron, I love Quorra even more.

Immediately after I got home from watching the film, I grabbed my blackest eye liner, blackest eye shadow, and a pair of false lashes and got to work. This pretty much sums up the tutorial we'll be going over today. Now I'm fully aware that, compared to Olivia Wilde's perfect peepers, my small, almond-shaped eyes may as well not exist at all. Nevertheless, I'm gonna do my best with what I've got. So here goes with my interpretation.
We start with naked eyes.

Well, not completely naked eyes. Remember when we learned to use eye shadow primer in our basic eye tutorial? We're gonna do that. Except, instead of putting on a layer of base shadow, we're going to simply use a small blush/powder brush to apply some pressed powder instead. (you can also use a kabuki brush to do so)


Repeat with the lower lash line.

For the next step, we're going to add a little wing. Using our liner, we're going to start at the outer corner of our bottom eyelid and draw a neat, tapered little flick upwards.

The result should look a little something like this:

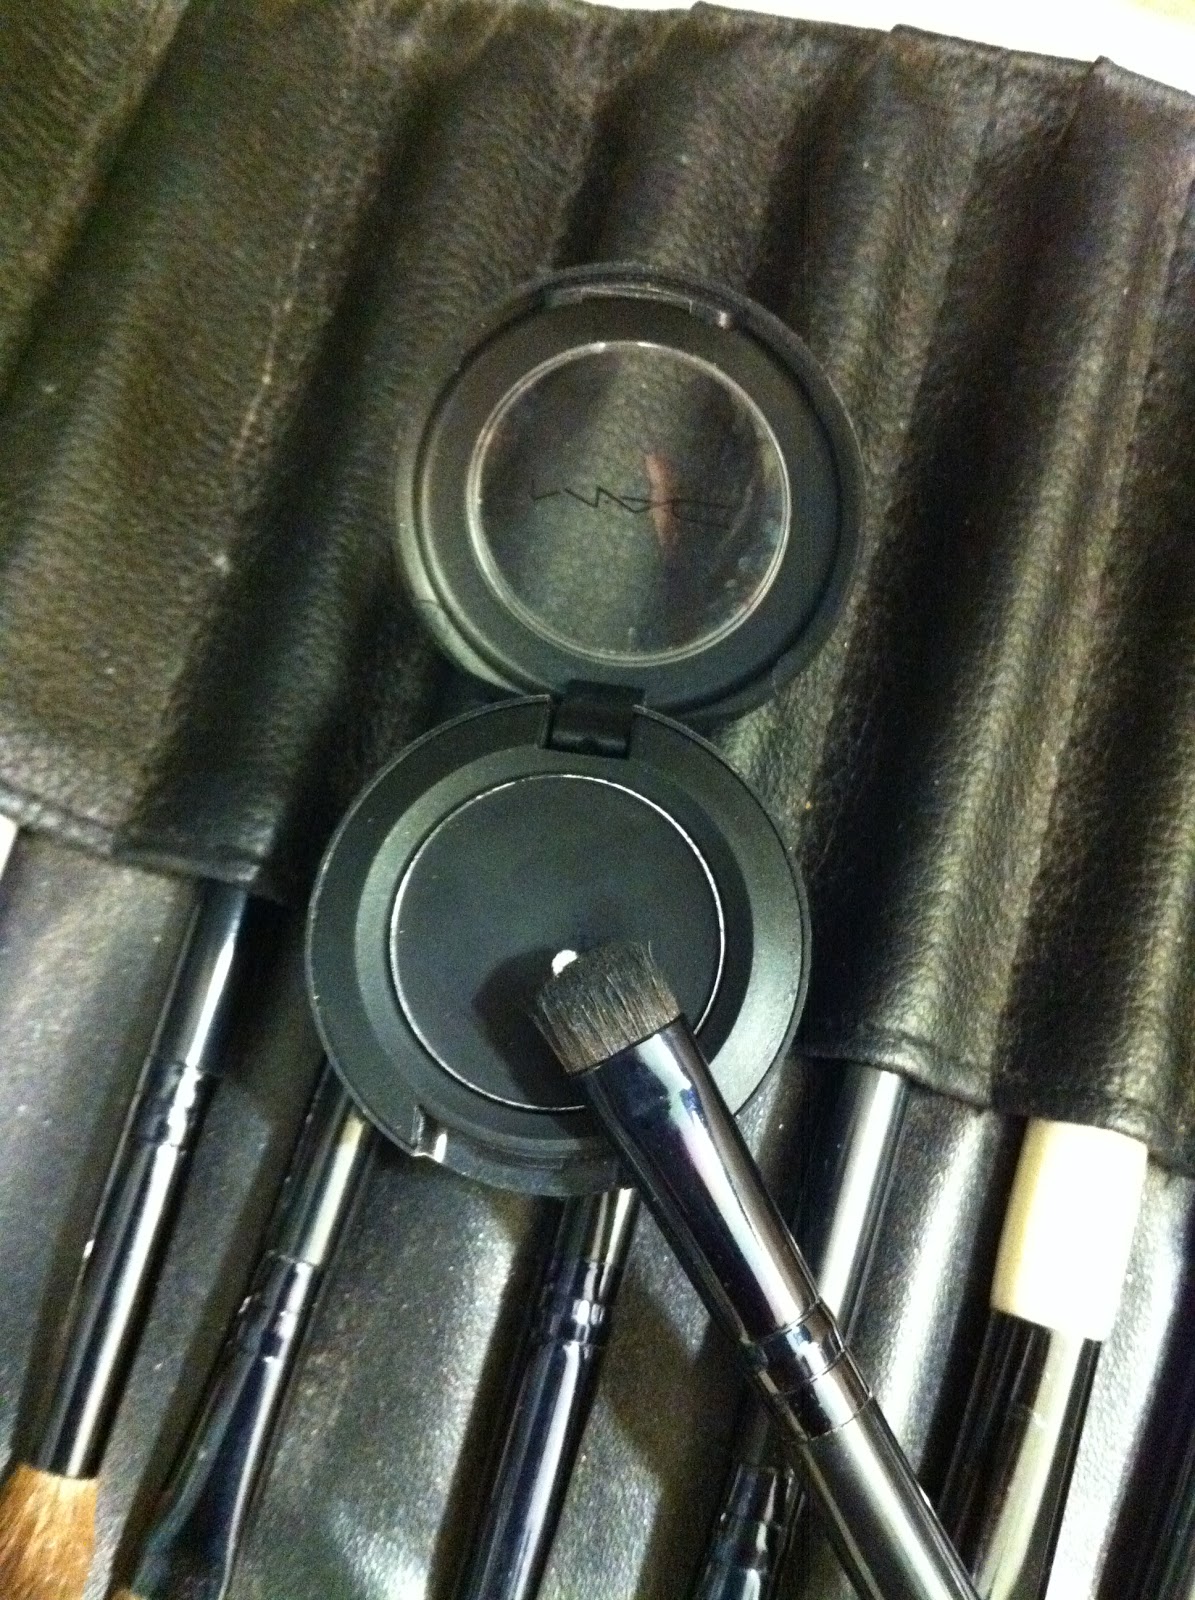
Now that we've drawn an eyeliner outline for our look, we're going to set and smudge our liner using a small smudge brush and black eye shadow. Here I'm using a Studio Basics small shadow smudge brush. I picked it up at Target for about $3. One of my fav shadow brushes ever. I loved it so much I bought three. As for black shadow, I'm using MAC's Carbon. MAC is expensive, I know. I just happened to have a gift certificate so this is what I used it towards. Nearly any other black shadow will do, including the one in the E.L.F 100 shadow palette, so don't feel like you have to get out there and get something expensive.

We're gonna want to pick up some black shadow on our smudge brush and basically layer it over our eyeliner in order to set it. By setting it, I mean to prevent it from budging. While we set our liner with shadow, we're also going to smudge and blend a little along the way to get a faint, smokey look. Start with the top lash line.

Then do the same to the bottom lash line:

Last, but not least, we're going to set our little wing by carefully applying black shadow on top of it. Be sure not to smudge too much or else you'll lose the definition.
The result should look sort of like this:

As far as the look, you can pretty much stop at this step. So if you're lazy, you're done! However, if you have the time and would like to add a little extra oomph to your Quorra eye, do think about trying the next two optional steps.
To take our look a little further, let's refine our wing. We're going to do so by neatening it with some black liquid liner. Here I'm using Prestige's Liquid Glitter Precision Eyeliner. Don't be fooled by the name. This liquid liner practically has no glitter in it. I just like to use it as a solid, black liquid liner. It's one of my favorites, I'm on my fourth or fifth one now. The formula is pretty smooth and the applicator is well-designed. The brush is very fine and the handle is nice and long so you get good precision. I picked mine up at CVS for less than $8.

Using our liquid liner, we're going to define the tip of our wing to a tidy little point.

Once we've completed this step, the result should look a little like this:

It's only a subtle difference, but you can see that our wing is nice and sharp where it was softer before.
Now that we're done with refining our wing, let's curl our lashes and add a coat of mascara to prep for our next step: adding false corner lashes. Now if you already have long and lush lashes, you can go ahead and skip the falsies step if you'd like. If you want a little extra something for some added drama, please proceed.

You'll want to take a pair of natural-looking lashes and cut them in half. (don't use lashes that are too full or else your wing will get lost in the fullness) We're going to use the shorter halves so you can either throw away or save the longer halves.
Apply a thin line of eyelash glue to your false lashes. I like to use dark glue because it dries to black, blending seamlessly with the black liner.

With the option of using tweezers for precision, adhere the lash strip right above your natural lash line along the outer corner of your upper eyelid.

Once you've completed this step, you're done!

Complete look, before and after:

There you go! Now we can all run around looking like Quorra. Yay! Ok, so I don't look anything like her, but a girl can always try. Maybe I'll get a wig or something. I hope these instructions have been helpful! As always, these tutorials are simply suggestions on how to achieve certain looks. Feel free to omit, or elaborate upon any of these steps. For example, to pump up the drama for our Quorra Eye, thicken the black liner and shadow and extend the wing out even further. Or, to kick it down a notch, nix the wing and forget about the extra lashes.
Those of you that know me probably know that I'm a fan of Tron. Thus, when Tron: Legacy premiered, I was absolutely ecstatic. It's one of my favorite films of all time. I'm not going to argue about plot, acting, dialogue, etc. I love it because I love it, period.
And as much as I love Tron, I love Quorra even more.
Immediately after I got home from watching the film, I grabbed my blackest eye liner, blackest eye shadow, and a pair of false lashes and got to work. This pretty much sums up the tutorial we'll be going over today. Now I'm fully aware that, compared to Olivia Wilde's perfect peepers, my small, almond-shaped eyes may as well not exist at all. Nevertheless, I'm gonna do my best with what I've got. So here goes with my interpretation.
We start with naked eyes.

Well, not completely naked eyes. Remember when we learned to use eye shadow primer in our basic eye tutorial? We're gonna do that. Except, instead of putting on a layer of base shadow, we're going to simply use a small blush/powder brush to apply some pressed powder instead. (you can also use a kabuki brush to do so)

Next, using my fav HIP Colorchrome black eyeliner, we're going to line our entire top lid. We're going to start drawing boldly from the outside corner and taper into a thin line as we reach the inner corner.


For the next step, we're going to add a little wing. Using our liner, we're going to start at the outer corner of our bottom eyelid and draw a neat, tapered little flick upwards.

The result should look a little something like this:

Now that we've drawn an eyeliner outline for our look, we're going to set and smudge our liner using a small smudge brush and black eye shadow. Here I'm using a Studio Basics small shadow smudge brush. I picked it up at Target for about $3. One of my fav shadow brushes ever. I loved it so much I bought three. As for black shadow, I'm using MAC's Carbon. MAC is expensive, I know. I just happened to have a gift certificate so this is what I used it towards. Nearly any other black shadow will do, including the one in the E.L.F 100 shadow palette, so don't feel like you have to get out there and get something expensive.
We're gonna want to pick up some black shadow on our smudge brush and basically layer it over our eyeliner in order to set it. By setting it, I mean to prevent it from budging. While we set our liner with shadow, we're also going to smudge and blend a little along the way to get a faint, smokey look. Start with the top lash line.

Then do the same to the bottom lash line:

Last, but not least, we're going to set our little wing by carefully applying black shadow on top of it. Be sure not to smudge too much or else you'll lose the definition.
 |
| Sorry about the blur, I must have blinked or something, but you get the picture. |
The result should look sort of like this:

As far as the look, you can pretty much stop at this step. So if you're lazy, you're done! However, if you have the time and would like to add a little extra oomph to your Quorra eye, do think about trying the next two optional steps.
To take our look a little further, let's refine our wing. We're going to do so by neatening it with some black liquid liner. Here I'm using Prestige's Liquid Glitter Precision Eyeliner. Don't be fooled by the name. This liquid liner practically has no glitter in it. I just like to use it as a solid, black liquid liner. It's one of my favorites, I'm on my fourth or fifth one now. The formula is pretty smooth and the applicator is well-designed. The brush is very fine and the handle is nice and long so you get good precision. I picked mine up at CVS for less than $8.

Using our liquid liner, we're going to define the tip of our wing to a tidy little point.

Once we've completed this step, the result should look a little like this:

It's only a subtle difference, but you can see that our wing is nice and sharp where it was softer before.
Now that we're done with refining our wing, let's curl our lashes and add a coat of mascara to prep for our next step: adding false corner lashes. Now if you already have long and lush lashes, you can go ahead and skip the falsies step if you'd like. If you want a little extra something for some added drama, please proceed.

You'll want to take a pair of natural-looking lashes and cut them in half. (don't use lashes that are too full or else your wing will get lost in the fullness) We're going to use the shorter halves so you can either throw away or save the longer halves.
Apply a thin line of eyelash glue to your false lashes. I like to use dark glue because it dries to black, blending seamlessly with the black liner.

With the option of using tweezers for precision, adhere the lash strip right above your natural lash line along the outer corner of your upper eyelid.

Once you've completed this step, you're done!

Complete look, before and after:

There you go! Now we can all run around looking like Quorra. Yay! Ok, so I don't look anything like her, but a girl can always try. Maybe I'll get a wig or something. I hope these instructions have been helpful! As always, these tutorials are simply suggestions on how to achieve certain looks. Feel free to omit, or elaborate upon any of these steps. For example, to pump up the drama for our Quorra Eye, thicken the black liner and shadow and extend the wing out even further. Or, to kick it down a notch, nix the wing and forget about the extra lashes.
Thursday, January 27, 2011
Style: New Jewelry Items!
Here are some pieces I recently added to the collection:

Happy browsing!
Hugs,
Cat
Happy browsing!
Hugs,
Cat
Beauty: Basic Lip
Hello hello! So, we're on our final basic makeup tutorial. Last, but certainly not least, we have LIPS! Let me start by telling you how much I love lips. As a little girl, I thought that lipstick was the very last word in makeup. To heck with all the other stuff, gimme a tube of lipstick to make me feel like a beautiful grown-up lady! I grew up enthralled by Hollywood movie scenes where elegant, glamourous ladies would pull out their compacts and apply lipstick with perfect precision right out of the tube. Thus, along with eyes, lips have always been favorite feature to play up.
Of course, when done improperly, lips can also get a little out of control. I went through some bad lipstick days where I thought it was cute to wear really dark lipliner with shimmery pale lipstick.

Yuck! Not hot. I'm not sure what I was thinking at the time. I also went through a dark purple lipstick phase as well.

I'm sure aubergine can be very classy on the catwalk, but definitely not for every day.
Alright, so let's get to the point. We're going to do a basic lip in a natural nude tone. This is my favorite lip look of all time. It's pretty much a no-fail lip that will go with any color, any time, day or evening. The basic ingredients are as follows:
Lip Liner
 This is my holy grail of all lip liner. It's a discontinued product in limited supply that I am only able to get through eBay, which means I shouldn't be telling anyone this if I want to continue to use it, but it's so awesome that I have to share. This is Smashbox's lip liner in Smashing Muse. It's a sheer, creamy, rosy-nude color that is perfect to wear under any lipstick or lipgloss. It glides on satiny-smooth and gives you a soft, translucent line as opposed to a harsh, solid line like most lip pencils. I don't know what I'll do when it's gone. I've been loyal to this product for at least 5 years. You can get yours for under $6 at my supplier here: Smashbox Smashing Muse
Lip Gloss
For this look, I'm going to use my new favorite lipgloss of the moment, which happens to be a brand owned by a good friend of mine.

Christal Clear lipgloss in Heather. This is a sheer, creamy gloss that's a fleshy-nude color with a hint of pink. It's non-sticky and very moisturizing so it double as a balm. You can get yours here: Christal Clear Gloss
Lip Defining Brush
Again, I'm going to have to turn to E.L.F. Cosmetics. Seriously, they should pay me to be their spokesperson. Their lip defining brush is the best lip brush I've used to date and it only cost me $1.

Here's the link: E.L.F. Lip Defining Brush It's actually out of stock right at this moment, but not to worry, I saw it at Target just the other day for the same price. You would also save money on shipping if you go that route.
Ok, so we start with bare lips:
Using your lip pencil, shape your lips by drawing right on your lipline. For a fuller lip, you can line just a smidge outside of your natural lipline. Less is more, overdoing lipliner will inevitably lead to the clown effect and we don't want that.


Of course, when done improperly, lips can also get a little out of control. I went through some bad lipstick days where I thought it was cute to wear really dark lipliner with shimmery pale lipstick.
Yuck! Not hot. I'm not sure what I was thinking at the time. I also went through a dark purple lipstick phase as well.

I'm sure aubergine can be very classy on the catwalk, but definitely not for every day.
Alright, so let's get to the point. We're going to do a basic lip in a natural nude tone. This is my favorite lip look of all time. It's pretty much a no-fail lip that will go with any color, any time, day or evening. The basic ingredients are as follows:
Lip Liner
Lip Gloss
For this look, I'm going to use my new favorite lipgloss of the moment, which happens to be a brand owned by a good friend of mine.

Christal Clear lipgloss in Heather. This is a sheer, creamy gloss that's a fleshy-nude color with a hint of pink. It's non-sticky and very moisturizing so it double as a balm. You can get yours here: Christal Clear Gloss
Lip Defining Brush
Again, I'm going to have to turn to E.L.F. Cosmetics. Seriously, they should pay me to be their spokesperson. Their lip defining brush is the best lip brush I've used to date and it only cost me $1.

Here's the link: E.L.F. Lip Defining Brush It's actually out of stock right at this moment, but not to worry, I saw it at Target just the other day for the same price. You would also save money on shipping if you go that route.
Ok, so we start with bare lips:
 |
| Yes, I am puckering |

If you're using a sheer lip pencil, like me, the effect is going to be very subtle, in fact, barely there. This is what I'm going for, however, a very natural look. Lip lining is actually a two-step process if you want your lips to look even and tidy. Next, you'll want to fill in your lips with the same liner as if it were lipstick. This will secure your lipgloss and minimize lip color from bleeding outside of your lipline.

Once you've completed this step, your lips should look sort of like this:

Unlike my bare lips above, these fully lined lips are an even, matte tone and are just a touch fuller.
The last step is color. You can use gloss or lipstick, whichever you prefer. I like using glosses because I like a sheer, natural lip. Lipsticks, for the most part, make my lips feel heavy and thick. Of course, dense lipgloss will feel the same. Therefore I stick to lightweight glosses or even sheer lipsticks.
Using your lip brush, pick up a little bit of gloss. You can add more as you go along if necessary. I like using a lip brush because you get more precision than applying color straight from the tube or with the included applicator. I start by dotting a bit on the centers of my top and bottom lip.

Next, spread the gloss so that it forms an even coat on your lips, taking care to keep the edges as clean as possible. Try not to let your gloss run past the lip liner.

Great! Now you're done. Easy as pie, no?

My goal was a sheer, even coat of rosy-nude color with a subtle sheen. Here is a small photo collage of the bare, liner, and lipgloss results so you can compare the differences. They're subtle, but notable.

Well, there you have it! Hope this post has been helpful. For next time, let's not play it safe and break our neutral rule by trying a daring lip color, such as a sultry red or a shocking fuschia. That oughta be fun. :)
Hugs,
Cat
Monday, January 24, 2011
Beauty: Basic Blush
Sorry I've been neglecting the beauty blog posts! I've been giving style and jewelry a little bit too much attention, but now I'm back on track.
On a side note, I want to take a minute to thank those of you who have been leaving comments. It definitely motivates me to keep moving forward with Style By Cat when I know that someone is actually reading it! So, thanks again. :) I really appreciate the feedback.
Ok, so, on to blush! I actually never understood the importance of blush until several years into practicing makeup. Until then, I always thought it was optional and sort of pointless. Here's the skinny on blush. First of all, it gives you a healthy glow, making you look more alive. I tend to look sallow and tired without it. Also, it highlights and contours your cheekbones, enhancing your facial bone structure. I consider it one of my top 3 essentials. If had to leave the house in a hurry and could only apply one product, blush would be right up there.
So here, we have foundation, eyes, and hair:
To apply the blush, I'm going to use the ELF Studio Complexion brush. It's made to be a powder brush, actually, but I really like using large brushes to apply my blush, it gives a more diffuse, and well-blended appearance. This brush is super-soft, doesn't shed, and you can get it for $3 here. For the record, ELF Studio brushes are wonderful quality for the price. I'm contemplating replacing ALL of my brushes with a set of these.
The blush I'm using is Rimmel London's Lasting Finish Powder Blush in Autumn Catwalk. This is one of my favorite blushes, I'm on my second compact already. It's inexpensive, at about $4.99 apiece and I really love the trio of shades. Perfect for contouring and highlighting! I got mine at CVS, but you can pretty much find it anywhere. They probably sell it for even less at Target or Walmart.

Next, you'll want to pick up some of the darkest pink on the end (which is surprisingly very pigmented, so you don't need a whole lot) and apply it high on your cheeks and far back, towards your ears. Apply in a small, circular motion.

You should have small, bright pink spots high and far back on your cheeks like this:

This may appear a little odd, but, not to worry, we're going to diffuse this clown-like appearance with the highlight shade:


On a side note, I want to take a minute to thank those of you who have been leaving comments. It definitely motivates me to keep moving forward with Style By Cat when I know that someone is actually reading it! So, thanks again. :) I really appreciate the feedback.
Ok, so, on to blush! I actually never understood the importance of blush until several years into practicing makeup. Until then, I always thought it was optional and sort of pointless. Here's the skinny on blush. First of all, it gives you a healthy glow, making you look more alive. I tend to look sallow and tired without it. Also, it highlights and contours your cheekbones, enhancing your facial bone structure. I consider it one of my top 3 essentials. If had to leave the house in a hurry and could only apply one product, blush would be right up there.
So here, we have foundation, eyes, and hair:
 |
| Pardon the fuzzy penguin robe. Our heater stopped working 3 days ago and it's been freezing in the apartment since. |
The blush I'm using is Rimmel London's Lasting Finish Powder Blush in Autumn Catwalk. This is one of my favorite blushes, I'm on my second compact already. It's inexpensive, at about $4.99 apiece and I really love the trio of shades. Perfect for contouring and highlighting! I got mine at CVS, but you can pretty much find it anywhere. They probably sell it for even less at Target or Walmart.

Next, you'll want to pick up some of the darkest pink on the end (which is surprisingly very pigmented, so you don't need a whole lot) and apply it high on your cheeks and far back, towards your ears. Apply in a small, circular motion.

You should have small, bright pink spots high and far back on your cheeks like this:

This may appear a little odd, but, not to worry, we're going to diffuse this clown-like appearance with the highlight shade:

Take your complexion/blush brush and swirl the light and medium shades together to form your highlight shade. You'll then want to apply it around the perimeter of the bright pink spots you created earlier with the darkest shade, blending contour and highlight colors as you do so.
You'll also want to apply your blush so that theres the widest coverage towards high and towards the back, tapering as you come towards the center of your face. Think in terms of a triangular shape.

The end result should look like a radiant flush:
 |
| Yay! I look lively, not like a zombie. |
So that's blush! Basic lips coming up. :)
Hugs,
Cat
Sunday, January 23, 2011
Product Review: Paul & Joe Cat Lipstick
Ok, this isn't an official review because I haven't used this product. But yesterday, when I was Urban Outfitters, I saw a colorful-looking lipstick tube on their makeup testing counter. There was a neat floral print on the outside of the tube, so I decided to roll it up to check out the lip color. I was greeted by something that looked like this:


You can imagine my surprise when a little kitten head popped out at me. I couldn't stop laughing. I would totally buy one if it didn't cost $25. And even if I did bite the bullet and buy it, I would probably never use it. It's just too cool of a novelty item. If any of you are interested, you can get it here: Kitty Lipstick
That's my fun, weird thing for the day.
Hugs,
Cat
Style: Happy Feet!
Just thought I'd share a cute look that I tried out today, check it out:

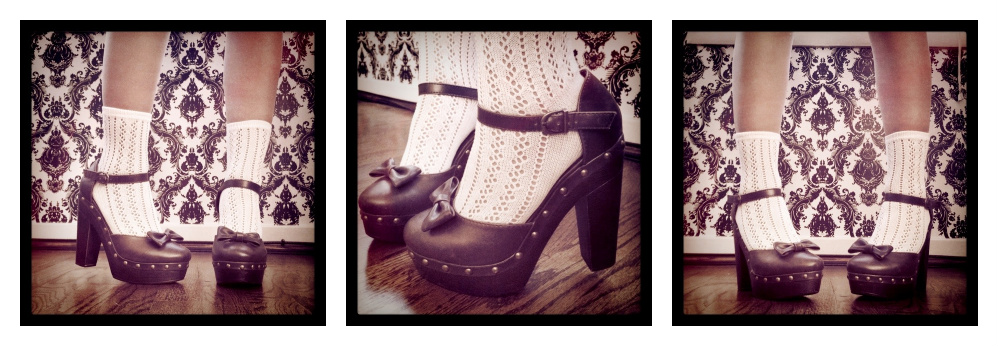
Now tell me...do you love it or do you love it? Isn't this whole set absolutely darling? I'm really digging the Lolita/Steampunk look to to this.
The shoes are a deep brown, leatherette, platform, mary jane clog with 5" heels. They're adorned with little leatherette bows of the same color and antiqued bronze studs. They look fantastic, but you can tell by the feel of them that the quality is only so-so. I'd be careful in them if I want them to last. They're also surprisingly comfortable for the height. Anywho, here's the best part: I got them at Forever 21 for less than $25. There are still some left, so if you hurry, you may still be able to get a pair here: Leatherette Platform Clogs
The crochet ankle socks I bought from Urban Outfitters in Berkeley. They were 3 pair mix and match for $18.
Love love love!!!
Hugs,
Cat
Saturday, January 22, 2011
Style: new Lovelina necklace and earrings
I've been busy! Check out this new necklace and earrings I just made:
I'm soooooooooo in love with this necklace. It's like, my dream necklace. I absolutely adore the vintage finish and the swirly shapes of the filigree. I want to wear it every day!
As for the earrings, I know they're a little redundant because of the lariat, but I couldn't help myself! I love love love asymmetrical earrings and just could resist.
These pieces are available for sale here: Lovelina on Etsy
 |
| Left: Midsummer Night's Dream Necklace Right: Birdhouse Birdie Earrings |
I'm soooooooooo in love with this necklace. It's like, my dream necklace. I absolutely adore the vintage finish and the swirly shapes of the filigree. I want to wear it every day!
As for the earrings, I know they're a little redundant because of the lariat, but I couldn't help myself! I love love love asymmetrical earrings and just could resist.
These pieces are available for sale here: Lovelina on Etsy
Friday, January 21, 2011
Style: Key To My Heart Earrings
Just thought I'd share a new piece from the collection. It's cute and simple the way it is, but can easily be customized with crystals for a hint of glamour.


Style: Great news for Lovelina Jewelry
I'm so excited! Lovelina opened it's little online jewelry boutique a mere 3 days ago and I made my very first sale yesterday. Our customer comes from the UK, which is awesome because I love selling to international clients. It makes me feel so worldly. :) Here's the cute little guy she purchased:

Excellent taste, if I do say so myself. This is my favorite piece from the collection. Well, just thought I'd share! Whoo hoo!
Hugs,
Cat

Excellent taste, if I do say so myself. This is my favorite piece from the collection. Well, just thought I'd share! Whoo hoo!
Hugs,
Cat
Beauty: Basic Eyes
*Heads Up* So, this is more like a 5-step process. There's a lot of text and images because I want to be as detailed as possible, but really, this look should only take about 5 minutes to achieve once you get it all down.
Eyes are such an important of human interaction. We use them to see, to communicate, to connect with others. They're the first thing that people look at when they're looking at your face. Thus, naturally, eyes are my favorite part of doing makeup. When enhanced properly, your eyes can become a very powerful tool. :)
Now that we have foundation and brows down, let's begin with bare eyelids.

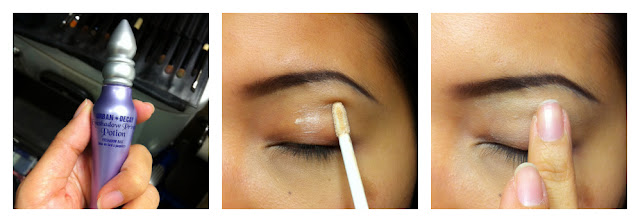
This next step is very important. It's the trick to making eyeshadow bold and long-lasting. You MUST apply eyeshadow primer to your eyelids before shading them. This is absolutely necessary, otherwise shadow colors will degrade over the course of the day due to the excretion of your natural skin oils. Here I'm using Urban Decay's Eyeshadow Primer Potion. It's lightweight, works well, and really enhances the pigments in your shadows. However, at about $18 a pop, the price is a little steep. Never fear! Any cheap ol' concealer will also do the trick. During leaner times, I have absolutely no qualms about using whatever concealer I may have on hand as a primer.
Apply primer to your eyelids and then use your fingers to distribute the product evenly.

Next, we're going to apply a base eyeshadow. Since this is a very basic eye, I'm going to stick to a neutral shade for the sake of simplicity. I'm going to use a large, flat eyeshadow brush to apply my color and will be using the 100 color eyeshadow palette from Eyes Lips Face.
Now I'm going to go off on a little tangent here and talk about how amazing this shadow palette is. While the quality doesn't quite compare to brands such as MAC or Urban Decay,you get some pretty decently pigmented shadows in a wide array of very wearable colors. Here's the best part, this 100 color palette only set me back $10. That's like 10 cents per color. You really can't beat a deal like that. For a bargain hunter like me, I was ecstatic! Best cosmetic purchase I've ever made. You can buy yours online here: 100 Shadow Palette

I'm going to apply a medium, semi-shimmery taupe shade to the bottom half of my upper eyelid. It isn't imperative to use these exact colors. You might not even like taupe. I know most of you probably won't have this palette on hand, so just use a neutral shade of your choice from your current shadow collection.

Again, this is the base color. Next, we're going to apply the highlight color. I've chosen a lighter,
silver-taupe shade with a hint of shimmer to complement my base shade. Using the same brush, you want to sweep it onto the upper half of your upper eyelid all the way to the brow.

The ensuing result should look something like this:

The effect is subtle, but you'll notice that, bottom to top, the colors fade from dark to light.
For the next step, you'll need a black eyeliner pencil. I'm going to use the HIP by L'Oreal Color Chrome Eyeliner in Chrome Black. This is my favorite pencil eyeliner at the moment. It glides on as fluidly as liquid and lasts really long. Love it! You can get it for around $8-$9 at Target.
Using the black eyeliner pencil, you're going to trace a line from the outer corner of your lid line to the center of your lid, tapering the line thinly as you reach the center. Do this for the top and bottom lid.

After finishing this step, your eyes should look something like this:
 |
| The eyeliner forms a V-shape |
Great! Now we're ready for some black eyeshadow. Oh my! Black eyeshadow? That sounds pretty intimidating, right? Black is about as bold as you can go and it's a permanent staple in my makeup bag. It's such a beautiful color that can easily be as subtle as it can be intense. Don't worry. If you're not comfortable with blacks, you can opt for brown. In that case, just use brown eyeliner for the previous step. Is black or brown too boring for you? That's ok! You can customize your look by using blue, green, purple, orange...whatever color suits your fancy. This is a very basic shadow technique that you can really play with. I'm just keeping it neutral for the sake of simplicity.
So, using either a small domed shadow brush or a small smudge brush, pick up a little black shadow (or any dark shade of your choice) on the tip of the bristles. If you have the ELF shadow palette, you may use either the matte black or glitter black.

Next, you'll want to layer the black shadow over the black liner that you previously applied. The black liner acts as a secondary eyeshadow base and really locks in the bold color. Smudge the shadow as you layer it over the liner, tapering and fading as you move from the outer corner to the center of the lid. Do this for both top and bottom lid.

Once you've completed this step, your eyes should look something like this:

If you want to keep things really simple, you're pretty much done at this point. Primer, base shadow, liner, black shadow...that's just 4 steps. Not bad, right?
The last thing I'm going to demonstrate is simply a supplement to this look. It's completely optional. We're just going to curl our lashes and add a little mascara to give our eyes a little more oomph.
Shu Uemura makes my favorite eyelash curler of all time, but I got into a fight with them so I defected to Shiseido instead which is almost as good. For mascara, I've been favoring Sephora's store brand lately. It's just a personal preference, but I like my mascara formula thin and smooth. I've given up on fat lashes, so the next best thing for me is to have tidy, uniform-looking lashes. Another favorite of mine is Maybelline's Full & Soft Waterproof.

The finished result should look something like this:

Here is a before and after eye shot:

Here is a before and after shot of the overall look, including cheeks, lips, and hair:

I developed this look after being inspired by Angelina Jolie's minimalistic yet beautiful makeup as portrayed in this set of images:
 |
| For Angelina's looks, this basic technique has been enhanced with false eyelashes and winged liner, something we'll be sure to cover at another time. |
Now I don't think I'll ever quite resemble the lovely Ms. Jolie, but after years of spending a lot of time applying makeup heavily, I've come to appreciate how simplicity sometimes brings out the best.
Generally, I feel that makeup should complement one's natural features, not compete with them. Of course, there will always be exceptions. What fun is makeup if you can't experiment creatively with color?
I hope this post has been helpful. Again, feel free to let me know if you have any questions or requests for future posts. I'll be concluding basic makeup with cheeks and lips in the ensuing posts.
Hugs,
Cat
Subscribe to:
Posts (Atom)